At Kerio Technologies website, you can find:
versions of operating systems supported by the Kerio Outlook Connector installation,
supported versions of MS Outlook.
To get the Kerio Outlook Connector installation package, follow these guidelines:
In your browser, enter your mailserver's URL address following the pattern
http://server_name/(e.g.http://mail.company.com/).If the address is correct, the Kerio WebMail login page is opened. Click on the Integration with Windows link displayed at the bottom of the login dialog.
This opens the Integration with Windows page. Simply click on Download Kerio Outlook Connector.
Installation wizard is used for the Kerio Outlook Connector installation. Once the installation is completed, it is necessary to set a profile and an email account explicitly (see section 5.1.2 Profile and Email account settings).
Warning
MS Outlook must be installed and at least once started on the computer prior to the Kerio Outlook Connector (Offline Edition) installation, otherwise the application will not function properly.
When the upgrade or downgrade of MS Outlook is performed, Kerio Outlook Connector must be reinstalled manually.
If you have used another mailserver (e.g. Exchange) and now you are switching to Kerio Connect, it is necessary to create a new profile in MS Outlook.
In the majority of cases, upgrade from Kerio Outlook Connector to Kerio Outlook Connector (Offline Edition) is smooth. At the beginning of the installation, a convertor is started which converts all Kerio profiles of the particular user to profiles for Kerio Outlook Connector (Offline Edition). If the station is connected to the Kerio Connect, the Kerio Outlook Connector's local database is created automatically and updated (referred simply as Kerio Outlook Connector).
Special cases:
- One workstation is shared by multiple users
If a workstation is used by multiple users, install the program once and then run the convertor () for each user.
- Kerio Outlook Connector is installed without connection to Kerio Connect
In such cases profiles are converted, but they must be finished upon connecting to the server:
In the profiles dialog (), select the Kerio profile and click on .
In the wizard, click on .
On the following page, double-click on the Kerio account and confirm settings by the button. Conversion to Kerio Outlook Connector profile is then finished automatically.
This procedure must be taken for each profile with Kerio account.
In MS Outlook, any number of user profiles can be created. Using of multiple user profiles is essential especially in the following situations: either the computer is accessed by multiple users and each of them needs his/her own email address or a user can access multiple mailboxes and wants to use different settings for each of them. In other cases, one profile for one or more email accounts is sufficient.
Warning
Only one Kerio Outlook Connector account is allowed in each profile.
For automatic configuration of profiles, there is a special tool called ProfileCreator. To get and start it, follow these guidelines:
In your browser, enter your mailserver's URL address following the pattern
http://server_name/(e.g.http://mail.company.com/).If the address is correct, the Kerio WebMail login page is opened. Click on the Integration with Windows link displayed at the bottom of the login dialog.
In the Integration with Windows page just opened, click on Click here to auto-configure Kerio Outlook Connector.
Depending on your browser and its settings, the tool gets downloaded and launched automatically or it only gets downloaded and you can run it by double-clicking on the tool's icon.
The script now creates a new profile and pre-configures your Kerio account.
Click on in the configuration to check whether the password is correct and whether the login data can be used for connection to the server.
Settings for a new profile can be configured in the menu:
In the Email Settings dialog, select the button.
Click on the button to create a new profile and enter its name. Any name can be used.
This opens the email account wizard, where a new account can be created. In the dialog, simply enable the Manually configure server settings or additional server types option.
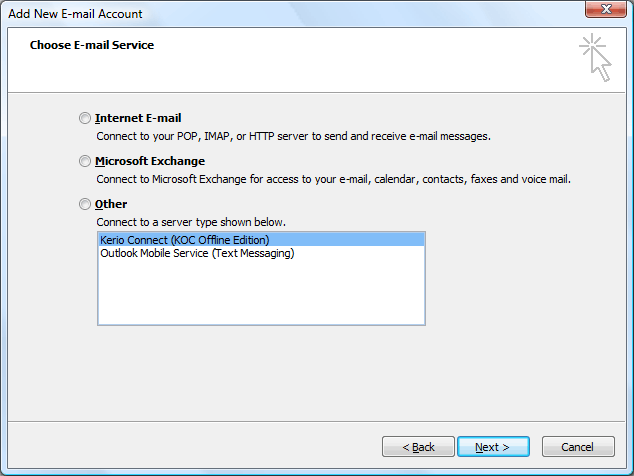
In the Choose e-mail service dialog, select the Other option and enable Kerio Connect (KOC Offline Edition) (see figure 5.1 New account settings — e-mail service selection). Click on .
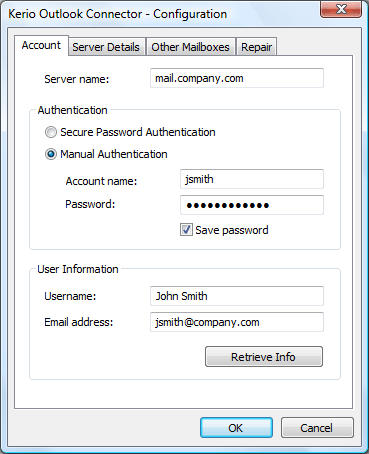
On the Accounts tab set basic parameters for connection to the mailserver (see figure 5.2 New account settings):
- Server Name
DNS name or IP address of the mailserver (for help, contact your network administrator).
- Secure password verification
This option allows using the NTLM authentication. When checked, users are not required to set usernames and passwords — authentication against domain will be used instead.
To make the SPA authentication work, both the computer as well as the user account have to be parts of the domain used for authentication.
- Username
Username used for logging to the mailserver. If the user does not belong to the primary domain, a full user name including domain is required (
jwayne@company.com).- Password
Enter your username.
- Save password
If you check this option, MS Outlook will remember your password and you will not be asked to enter it again from that time on. If there are multiple persons that access the computer, it is not recommended to check the option for security reasons.
Press the button to test if correct user data has been specified and if the connection to Kerio Connect works properly. If the test is finished successfully, a corresponding User Name and Email Address are automatically filled in.
By default, any traffic between Kerio Connect and MS Outlook is secured by SSL. If there are no problems encountered regarding encrypted traffic, it is recommended to keep settings unchanged.
Updates of Kerio Outlook Connector are performed automatically. In addition to this, update check for new versions of Kerio Connect and Kerio Outlook Connector is performed upon each startup of MS Outlook. If a new version is available or the versions are different on the server and the client, a recommendation for update of Kerio Outlook Connector appears. Once this dialog is confirmed, update is performed, followed by an automatic restart of MS Outlook. The whole update including restart should take up to two minutes, depending on connection data-flow speed.

