Kerio Outlook Connector allows setting of rules for incoming email. These rules sort new email automatically in accordance with our criteria (settings). How does it work? If rules for incoming mail are not defined, all new email is delivered to the Inbox folder where we can read it and sort items to folders manually. Rules for incoming email simplify this complicated procedure. The rules defined for incoming email sort incoming items automatically by using set criteria. Automatic sorting saves our energy and time. If you are too busy, you can simply read only the high-priority items, while leaving other email (e.g. mailing list responses) for later.
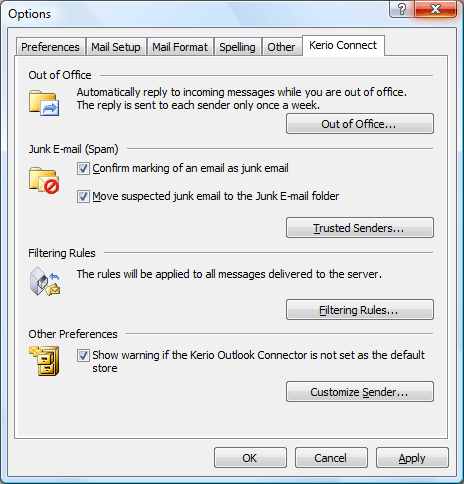
Rules for incoming email can be set under , on the Kerio Connect tab (see figure 5.11 Options — Kerio Connect). On this tab, click on . This opens the Filtering Rules dialog where new rules can be created or existing ones can be changed (for details, refer to section 5.7.1 Creating or changing a rule).
Warning
After installation of the Kerio Outlook Connector, it will not be possible to use the standard MS Outlook's dialog for administration of rules for incoming mail and alerts Rules and alerts (under ).
New rules can be created under , on the Kerio Connect tab (see figure 5.11 Options — Kerio Connect). Click on Filtering Rules. This opens the dialog where rules can be managed (see figure 5.12 The Filtering Rules dialog).
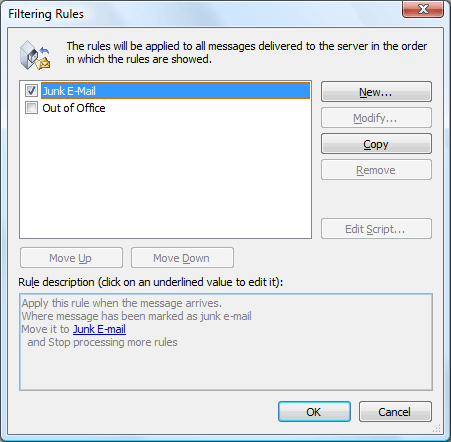
The following buttons and functions are available:
— creates a new rule (see below).
— edits selected rule (see below).
— copies an existing rule. This rule must be renamed. This function can be useful when you intend to create a new rule that differs from the existing rule only in details.
— removes the selected rule.
— edits the rule source using the Sieve code (encoding used for sorting rules descriptions). We recommend you not to use this function unless you are experienced in the Sieve code.
Rules are tested from the top downwards. That means that it is necessary to be careful where the rule is placed to avoid the situation where one message would be copied to multiple folders. You can use the and buttons to move rules within the list.
The Rules tab may include two predefined rules which cannot be edited as described below. These rules are the Spam and Out of office rules.
The Spam rule moves any messages recognized by the server as spam to the Spam folder. If this rule is existing, it was created by the Kerio Connect administrator while creating the user account. To set this rule, go to the menu on the Kerio Connect tab. To learn more on this rule and related spam topics, refer to chapter 5.7.3 Junk E-Mail rule.
The Out of office rule provides automatic answers to email messages where the recipients are absent to do it by themselves. To set this rule manually, go to the menu on the Kerio Connect tab. The rule is focused in section 5.7.2 The Out Of Office rule.
Use the button to open the Rule Editor dialog which includes the following sections:
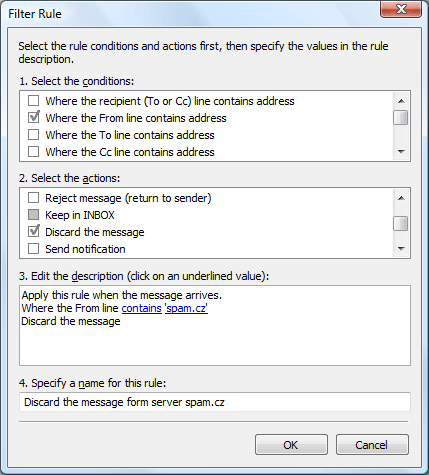
Select the conditions for your rule — conditions that must be kept so as the email administration meets this rule. One or more conditions from this list can be selected:
- Where the recipient (To or Cc) line contains address
The To or the Cc (Copy To) entry includes defined string (email address). This means that messages will be sorted by recipient's address.
Usage example: This is helpful when aliases are used to forward email to your address. For example, orders are sent in this way to sales@company.com. All messages with this address can be delivered for example to a folder labeled as Orders.
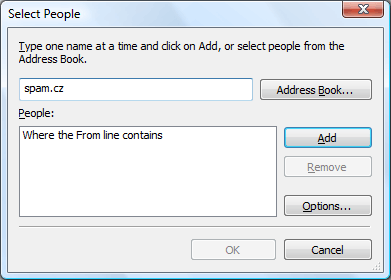
- Where the From line contains address
The From entry includes defined string (email address).
Usage example: This option is useful if you want to save or forward messages from a particular sender (or more senders) to a single location.
- Where the To line contains address
The To entry includes defined string (email address).
Usage example: See Where the recipient (To or Cc) line contains address.
- Where the Cc line contains address
The Cc (Copy To) entry includes defined string (email address).
Usage example: See Where the recipient (To or Cc) line contains address.
- Where the Sender line contains address
The
Senderentry includes the string. This entry is often contained in messages sent automatically (mailing lists, etc.) where it stands for theFromentry.- Where the Subject contains specific words
The Subject entry contains defined string(s).
Usage example: This option is useful for example for mailing list email where messages contain the mailing list's name.
Note
Kerio Connect spam filter can be set so that the Subject entry will include results of antispam tests (the value is represented by asterisks). Using this feature spam may be filtered easily. Simply insert the number of asterisks that will specify the rule. Messages that match this rule will accept this specification.
- Where the message has an attachment
At least one attachment must be appended to the message.
Usage example: It is useful when combined with the Where the message size is more/less than size condition if a quota is applied to the mailbox and all messages larger than the set limit should be sent to another mailbox where you have enough space.
- Where the message size is more/less than size
The message size exceeds the specified value. To specify the size you can select from the following units: bytes (B), kilobytes (KB) and megabytes (MB).
Usage example: It is useful if a quota is applied to the mailbox and larger messages should be sent to another mailbox where you have enough space.
- Where the message was detected as a spam
Spam are undesirable messages sent to users. You can use the Kerio Connect antispam filter to protect your users from such messages. This filter uses special header items which include message evaluation and information about applied antispam testing.
- For all messages
This rule is valid for all incoming messages.
Select the Actions for your rule — select an action that will be taken for messages matching with condition in section 1
- Move the message to a specified folder
Move the message to the selected folder (you can choose a folder from a list).
- Forward the message to an address
Forward to a specified address. In this case no other actions are performed.
- Reject message (return to sender)
The message will not be stored in a local mailbox and the user will never be informed about it.
- Keep in Inbox
This action must be combined with another (i.e. with Move, Forward, Reject, etc.). It cannot be combined with the Discard the message action.
- Discard the message
The message will not be stored in any local folder. This action cannot be combined with the Keep in INBOX action.
- Send notification
Sends notification (i.e. a short text message) to a specified address, typically to a cellular phone. It is necessary to define even cellular phones by email addresses, for example
<john.bluemonday@t-mobile.com>.The following macros can be used in the message text:
$from$— the notification will show the message sender or the address contained in the From field.$from-name$— the notification will show the name of the message sender.$subject$— the notification will show the message subject.$text$— the notification will show the message text. Only the first 128 characters will be displayed. To reduce the number of displayed characters, edit the macro as follows:$text[50]$(the number in brackets represents the maximum number of characters displayed in the notification).The recommended text for notifications: From: $from$, Subject: $subject$, Message body: $text$
Note
To display correctly on mobile phones, any diacritics is removed from the delivered notification.
- Send autoreply
The automatic reply with a specified text. The automatic reply will be sent to each sender's address only once a week (so that the automatic reply does not create a loop in case there is an automatic reply set at the other end).
- Stop processing more rules
If the message complies with this rule, no more rules will be processed. Using this function a user can create more complex rule systems for individual condition types. Rules are tested rule by rule from the top downwards.
Note
Notifications and autoreplies are protected from loops. This means that the system does not send a notification in reply to received notification or automatic replies. The detection of notification or automatic replies is performed using special items in the message header. Only notifications and automatic replies generated by Kerio Connect are detected.
Rule description — description of the rule function (it is generated automatically according to the rule definition). Highlighted entries are interactive — click them to set other parameters.
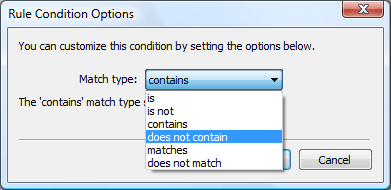
Click on the button to open the Rule Condition Options dialog — see above.
- is
The entry must exactly match with the specification.
- is not
The entry must not match with the specification.
- contains
The entry must contain the (sub)string.
- does not contain
The entry must not contain the specified (sub)string.
- matches
The entry must match the expression (the expression can contain the
?and*wildcards that can represent one or more characters).- does not match
The entry must not match the expression.
Note
If more than one condition is defined, an appropriate logical operator must be used (and — both conditions must be met, or — at least one of the conditions must be met).
Example: You intend to create a rule that would drop all messages incoming from the spam.com domain which often sends undesirable messages (spam).
Select the Where the line From contains condition in the first dialog section.
Select the Discard the message option in the second section.
Select the contains option in the third section and specify the domain name (
spam.com).Enter a name for the rule (i.e. Drop all messages from the spam.com domain).
The Out of office rule allows sending of automated responses to all incoming messages. This rule is helpful when you go out of office for longer time (illness or vacations). This rule helps inform business partners and colleagues that their requests will be solved later, after you return to your office.
A special rule for automatic replies can be set on the Kerio Connect tab in . This rule can be used when a user is not available in the office for a certain time. Simply enable the Send automated reply that I'm out of office option and add a comment that will be sent in the reply to delivered email.
Warning
Before enabling the Out of office rule, it is recommended to enable also the Spam rule to make sure that automatic replies are not sent to spammers. If the Spam rule is not enabled, your address will be exposed to spammers who try to send their spam messages to randomly generated addresses and later use those addresses from which they get an answer (so that they are sure the address exists and start to send even larger volumes of spam messages to it).
Note
The I'm out of office rule beats the rules for incoming messages. If the filter includes a rule which sends automatic replies, the action set in this rule will not be taken.
The I'm out of office rule consists of the following items:
Condition: The rule will apply to all incoming messages except email sent from mailing lists. The automatic answer is not sent where answering to another automatic email (this should prevent users from email loops).
Action: The text entered will be sent to each sender's address included in an incoming message once a seven days.
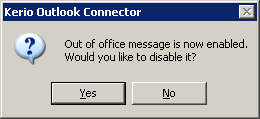
If the rule is enabled (i.e. the I'm out of office option is on), a question whether the automatic replies would be on or off is issued (see figure 5.16 Possible cancellation of the Out of office rule) upon each startup of MS Outlook. In this case it is supposed that once you run MS Outlook, you are not out of office any more and you are now able to reply to your email. This feature also ensures that you do not forget to turn the rule off once returned to the office.
The Spam rule can be created either by the network administrator within network configuration or you can do it by yourself. As suggested by its name, the rule helps identify spam and moves recognized spam messages to the Spam folder automatically.
To configure the Spam rule, go to , tab Kerio Connect. This tab includes the Spam section where it is possible to enable the Spam rule and set other details concerning spam (see figure 5.17 The Junk E-mail tab):
- Confirm marking messages as spam
This option enables/disables alert window displayed upon clicking on the button which is available in the toolbar.
- Move suspected junk e-mail to the Junk E-mail folder
If this option is enabled, all email considered as spam will be delivered to the Junk E-mail folder automatically.
Note
The Move spam to the Junk E-mail folder rule beats rules for incoming mail. If the filter includes any rule which in any way handles messages marked as spam, the action set in this rule is ignored.
This option also enables adding email addresses to the list of trustworthy users (see below).
Addresses to which you send email will be added to the list automatically.
Addresses can be also added manually under , on the Kerio Connect tab (see figure 5.17 The Junk E-mail tab). On this tab, click on . This opens a dialog (see figure 5.18 Trusted Senders) where addresses can be defined:
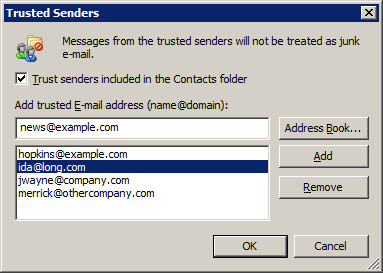
- Add trusted E-mail address (name@domain)
This address must be specified in the
username@domainformat.- Trust senders included in the Contacts folder
This option allows that messages from users belonging to the default contact folder are not tested against spam.
This option supposes that email addresses in one's contact list are trustworthy. If this option is enabled, it is not necessary to include addresses saved in the default Contact folder in the whitelist.