Nokia Eseries allows folder synchronization by the ActiveSync protocol if the Nokia's Mail For Exchange application is installed on the device. Installation and configuration of the application are addressed in section 4.6.1 Mail For Exchange Settings
Devices E52, E55, E72 and E75 already have Mail for Exchange installed.
Mail For Exchange with Kerio Connect provide the following options and features:
Nokia Eseries supports the ActiveSync protocol, version 2.5.
Nokia Eseries supports synchronization of the following folder types:
Inbox — other email folders are not synchronized.
Other folders and subfolders (only Nokia E52 — E75 with integrated Mail for Exchange).
Calendar — the default private calendar.
Contacts — the default private contact folder.
DirectPush Technology — this technology allows mobile devices to keep open HTTP(S) connection with the server. Whenever a new item is received or any change is performed in any folder, changes are synchronized immediately.
Kerio Connect supports Global Address Lookup — this feature allows to look up email addresses in all contact folders available to the particular user (including public folders).
This version allows installation of the root certificate on the device — this implies that it is also possible to use the Kerio Connect's self-signed certificate for encryption.
Mail For Exchange does not support the following features:
It is not possible to synchronize public and shared folders.
It is not possible to accept/reject an invitation. Invitations can be viewed in Inbox but it cannot be manipulated — it does not offer the and buttons and it is not displayed in the calendar.
The Mail for Exchange application is not standardly included in the mobile device set. Therefore, it is necessary to install it. Import and installation of the application is described in the application's guide which is available at the Nokia website.
Note
This chapter describes settings for devices Nokia E60 and Mail For Exchange 1.3.0. It can, therefore, slightly differ on other versions.
After installation of Mail for Exchange, locate the application (see the icon at figure 4.20 Icon of Mail For Exchange 1.3.0) and open it.
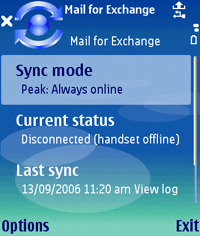
In the application, select the Sync mode option (see figure 4.21 Mail For Exchange welcome page).
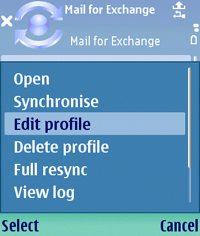
In the menu just opened, select the Edit profile option (see figure 4.22 Options → Edit profile)
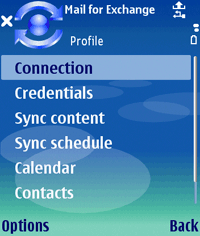
In the Profile menu, select Connection (see figure 4.23 The Edit profile menu).
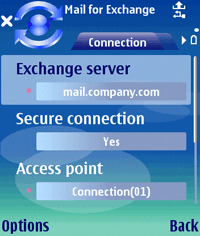
This opens a dialog for connection to the server. The first section to be set is the Connection tab (see figure 4.24 The Connection dialog). The following parameters are to be set here:
- Exchange server
Enter the server's internet name or IP address.
- Secure connection
The Secure connection option allows encryption of any traffic between the server and the device. It is highly recommended to keep the option enabled to protect your connections from debugging and misuse.
To allow the encryption, it is required that an SSL certificate is installed on the device. If your company uses certificates authorized by a commercial certification authority, it is possible that your device already includes support for SSL encryption. If the company uses a certificate generated by Kerio Connect or another internal certificate, it is necessary to install another certificate on the device. Guidelines for this installation are provided in section 4.2 SSL Certificates.
Now, save settings of the tab.
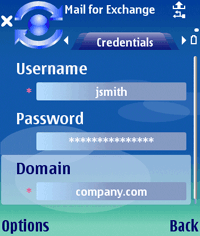
In the Profiles menu, select Credentials. Enter login information used for connection to your mailbox (see figure 4.25 The Credentials dialog):
- Username
Use the Username textfield to enter username used for connection to the mailbox in Kerio Connect.
- Password
Use the Password textfield to enter password used for connection to the mailbox in Kerio Connect.
- Domain
Use the Domain textfield to enter the name of the email domain (if you are not sure about this part, contact your administrator).
Save the settings.
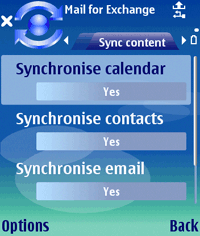
In the Profiles menu, select Sync content. On this tab, set folders to be synchronized (see figure 4.26 The Sync content dialog). The tab also allows selection of preferred store for possible collisions. Collisions might occur when some folders to be synchronized have been changed both on the server and on the device since the last synchronization. In accordance with the settings, either the changes performed on the server will beat and overwrite the changes in performed on the device (the Server wins option) or the other way round (the Phone wins option) within the ActiveSync. By default, the server beats the device. It is recommended to keep these settings.
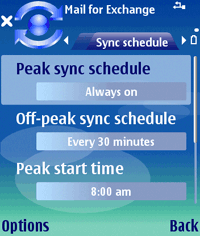
In the Profiles menu, select Sync schedule. On this tab it is possible to schedule automatic synchronization (see figure 4.27 The Sync Schedule dialog):
- Peak sync schedule
Sets the synchronization interval for peak time (the time when you need as fresh information as possible, usually this time includes the working hours).
- Off-peak sync schedule
Sets the synchronization interval for off-peak time (usually at night).
- Peak start time
Setting of the peak time start.
- Peak end time
Setting of the peak time end.
- Peak days
Setting of peak days (all working days are set by default).
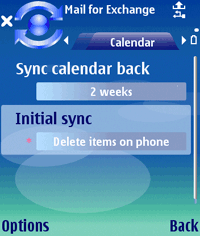
Return to the Profiles menu and select the Calendar option. On this tab it is possible to set parameters of automatic synchronization (see figure 4.28 The Calendar dialog):
- Sync calendar back
All upcoming events are included in the synchronization. However, to shorten the time needed for synchronization, it si possible to set the maximum age of events to be synchronized (it is not necessary to synchronize old data where the information will not be needed any longer).
By default, data up to two weeks old is synchronized. If you need to synchronized also older data, change the settings. In such a case, bear in mind that at least the first synchronization may take longer.
- Initial sync
Before the first synchronization of the server with the device, it is necessary to remove one of the stores to avoid collisions. The Initial sync option specifies whether data on the server (Keep items on phone) or on the device (Delete items on phone) will be removed during the first synchronization.
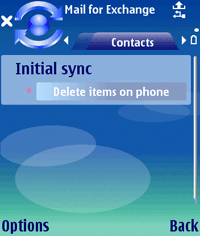
In the Profiles menu, select the Contacts option. This tab allows setting of solution for possible initial collision (see figure 4.29 The Contacts dialog). Before the first synchronization of the server with the device, it is necessary to remove one of the stores to avoid collisions. The Initial sync option specifies whether data on the server (Keep items on phone) or on the device (Delete items on phone) will be removed during the first synchronization.
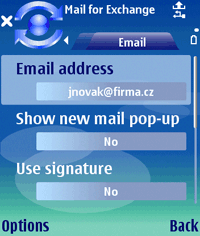
In the Profiles menu, select the Email option. On this tab, it is possible to set parameters of synchronization of email folders (see figure 4.30 The Email dialog):
- Email address
The option requires entering of the email address.
- Show new mail pop-up
Enables/disables new mail notifications.
- Use signature
Allows adding of a footer to email messages.
- Signature
Footer definition.
- When sending mail
Setting of time when email is sent (immediately or during the upcoming synchronization).
- Sync messages back
All unread messages are included in the synchronization. However, to shorten the time needed for synchronization, it si possible to set the maximum age of messages to be synchronized (it is not necessary to synchronize old data where the information will not be needed any longer).
By default, synchronization is set to messages up to three days old. If you need to synchronized also older data, change the settings. In such a case, bear in mind that at least the first synchronization may take longer.

