This section describes which actions, besides creating, changing and removing of events, allow connection between MS Outlook and Kerio Outlook Connector. There is no doubt that the main advantage is the option of meeting scheduling and management of web calendars (only in MS Outlook 2007).
Meeting is a special type of calendar event allowing adding and management of other attendees (for details, refer to chapter 1.8.7 Appointments).
Open a new event dialog to enter subject and site where the event (meeting) will take place.
Click on .
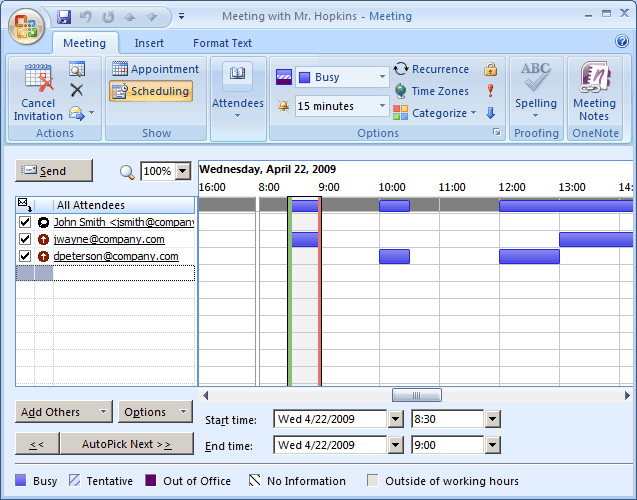
and enter individual participants of the meeting (see figure 5.7 Usage of the Free/Busy calendar). When attendees are added, free time of individual attendees is displayed in contrast with level of their busyness shown by blue color (MS Outlook does not support viewing of user busyness level). The users with no data on the free/busy server (users with no account, users that do not use the calendar) are marked with hatch. Colors are explained in the key at the bottom of the window.
Warning
It is necessary to specify each user by their usernames and domains (
username@domain). Aliases cannot be used to display Free/Busy information.The slide window in the schedule shows the time of the suggested meeting marked by a green and a red vertical line where the time range should start and end.
Traffic between the Free/Busy server and MS Outlook can be secured by SSL encryption. This requires SSL encryption to be enabled in the account settings and the Kerio Connect's SSL certificate to be installed. For this purpose, you can use either a certificate issued by a trustworthy certification authority or a so-called self-signed certificate which can be generated in Kerio Connect (for details on certificates as well as their creation and authorization, refer to Kerio Connect 7, Administrator's Guide).
- Enabling SSL traffic in account settings
In account settings (under ) on the E-mail tab, click on the Kerio Connect (KOC Offline Edition) account and in the account settings on the Server Details enable Use secured connection (SSL).
- Installation of the certificate in Internet Explorer
Run Internet Explorer and specify the corresponding URL to login to the Kerio WebMail interface. SSL-secured protocol must be used for the connection to the server. This implies that the URL should start with
https://(example:https://mail.company.com/).A window reporting the certificate issue is opened. Click on Continue to this website (not recommended) to open the Kerio Connect Administration/WebMail login page.
To avoid future certificate issues, it is necessary to install the certificate. Click on the Certificate Error → View Certificate option next to the welcome page URL. Use the button to start the installation wizard. When finished, the certificate gets installed.
In the dialog with certificate details displayed, click on the button.
A certificate installation wizard is opened. There is nothing to be set in the wizard. Simply confirm all settings and close the wizard to install the certificate.
The other option is to download the certificate from page Integration with Windows/Mac/Linux. A link to this page can be found on the Kerio Connect WebMail login page. Click on Download SSL certificate to save or install the certificate on your computer.
Kerio Connect now provides an electronic management of resources shared by employees of your company. Resources are rooms and devices available in the company, such as OHPs, whiteboards, cars, etc. Resource management allows to:
book a resource for a particular time,
view current resources and their reservations in the Free/Busy server (for details on Free/Busy server and information on appointments, see section 5.4.1 Appointments) when planning reservations,
subscribe resource calendars by using standard sharing/delegation,
set the resource manager who can decide on priorities in case of any collisions in reservations.
Resources can be booked by using the existing calendar system. Resource reservation is based on creating of en event. The feature works similarly as appointment scheduling. The main difference is that the Attendees tab must include the resource selected from the contact list (it can naturally also include contacts of attendees). In the Free/Busy calendar you can see whether the resource is available for the scheduled time or not.
Note
To make a resource available for booking, it is necessary to create it in Kerio Connect first. If you need to create a new resource, contact your network administrator.
Note
The settings described are provided for MS Outlook 2007. If you use another version, settings may differ slightly.
To book a resource, follow these instructions:
Open a new event and specify its subject.
Click on the Scheduling button in the new event's toolbar (see figure 5.8 Resource reservation).
Add the resources email address to the list of attendees (e.g.
car1@company.com). If you do not know the address of the resource, you can find it in the public contact folder called Resources (click on under Resources — Public Folders).If the Free/Busy calendar is working, information about the source is shown in the right section of the dialog. It is therefore easy to check right away, whether the source is free or already booked by another user for the suggested time (see figure 5.8 Resource reservation).
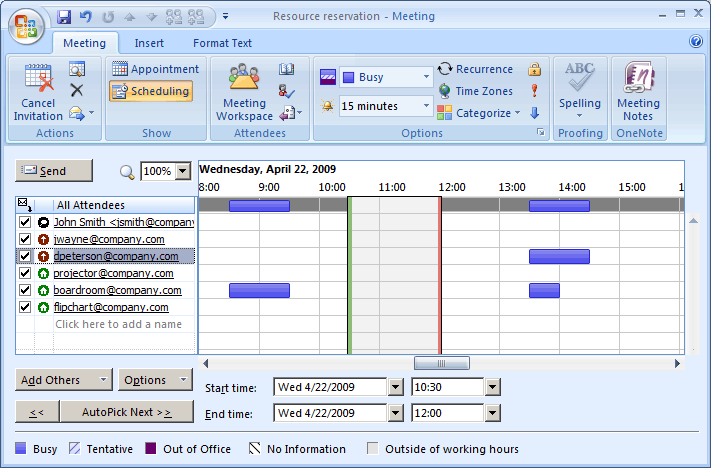
You may have noticed that there are also other attendees in the list shown in figure 5.8 Resource reservation. Resources can be reserved either for usual appointment or for meetings (see section 1.8.7 Appointments).
Each resource created in the system has its own calendar where all reservations are displayed. Calendars of individual resources can be subscribed through the standard sharing process (subscription of shared folders is focused in chapter 5.9.1 Folder Sharing).
Most user can access resource calendars in the read-only mode. Resource calendars can be edited only by the resource manager. The role of resource managers and their rights are addressed in the following section.
In certain situations, it is necessary that a resource is booked even if it has already been reserved or that there is no other way than to make the reservation by a phone call. For such purposes, there exists a user with special rights for company resources management. Resource managers can access resource calendars with administration rights. This implies that they can edit, remove or move reservations in the particular resource calendar. They can also create new reservations.
If you are a resource manager, first it is necessary to subscribe calendars of all resources that you would manage:
Go to .
Click on the Kerio account and press .
Go to the Other Mailboxes tab and click on .
In the Attach Mailbox dialog, enter source name including the domain (see figure 5.9 Configuration dialog of the Kerio account — Other Mailboxes).
If you are a manager of multiple resources, subscribe all calendars as described in steps
1to4.

Once subscribed, calendars of individual resources are shown in the folder tree. Each resource calendar now shows all reservations of the particular item done by any users. The resource manager can edit reservation time, add new reservations or remove them if demanded.