This chapter focuses on folders used as a more efficient electronic substitute of paper calendars. What is it that is so amazing about electronic calendars? There are several benefits of these gadgets:
visual alerts and event reminders,
various view options (day, week, year, etc.)
scheduling of meetings,
resource reservation,
access from anywhere provided that there is an Internet connection available.
Before we focus on features of calendar folders, basic terminology will be addressed. There are two most essential items, events and meetings. Events are calendar items with time scheduled whereas meetings are events where other participants are involved (invited).
Several view modes are available for calendars. Users can select a view type which they currently find the most useful. In this section, detailed descriptions of individual view modes are provided.
Users can switch between individual types of calendar views by clicking the appropriate icon in the toolbar:
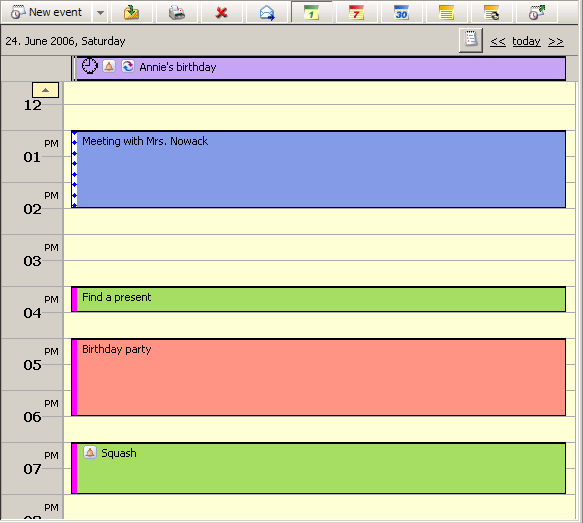
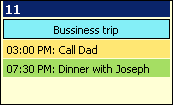
The day view is the most detailed one since it focuses the shortest period. The schedule is divided into 30-minute periods market by a clock symbol on the left. The current interval is highlighted in yellow color (the first half-hour of the 12th hour in the picture 1.46 Day view).
The single-day view header serves to better reference in the calendar. In the left section, the current day and date are displayed; in the right section, there is a thumbnail calendar icon with sliders.
The individual calendar events are ordered in a vertical timeline. Each event is marked by a colored stripe and it contains the basic information (subject, location, whether it is private or not and if is has a notification). Whole-day or multiple-day events are displayed in the upper section of the calendar, before the timed schedule (so that these events do not mess into the daily schedule).
The events in this type of view can be moved to a different time using the mouse pointer or extended to cover more hours. To move an event, move the mouse pointer to the left stripe marked with a different color. After the pointer changes its shape to four arrows, click the left mouse button and move the event to another time. To extend or reduce the time interval of an event, move the pointer to the upper or lower area of an event and after the pointer changes its shape, click the left mouse button and edit the event as necessary.
Focus once again on the left coloured vertical stripe. This area shows the time of the event's duration. If the event is shorter than half an hour, the stripe is shorter as well so that users can recognize the time period taken by the event.
The coloured stripe also shows level of the user's busyness during the event:
purple stripe — away,
full blue stripe — busy,
dash blue stripe — tentative,
grey stripe — free.
The fastest and most simple way to open and edit an event is to double-click on it.
To open a new window and define a new event, double-click on the calendar line corresponding to the time which we want to set the event for. The time is set automatically in accordance with the row where the new event was opened. The day is also preset in the definition.
Events in the calendar may be distinguished by colors (see figure 1.46 Day view). Colors associate various event types (such as events referring to work, to private issues, to important issues, etc.) and make manipulation with the calendar more transparent. Colors of events can be defined in the event's edit dialog.
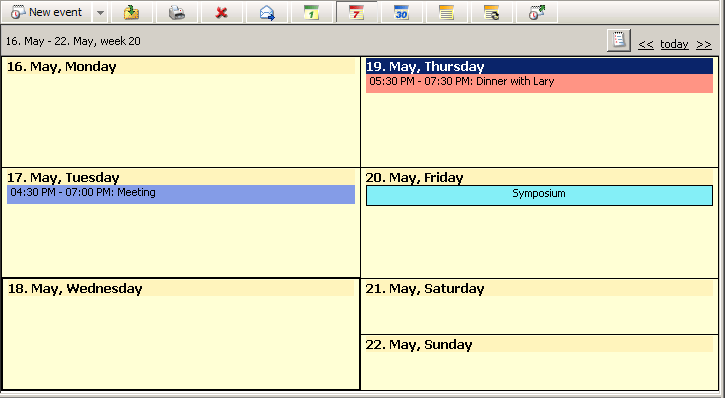
One week display mode (including Saturday and Sunday). The events in the week view are marked as colored stripes (according to the event type). If more events are displayed in a single day, they are ordered by type as follows:
The all-day or multiple-day events — these are displayed without any time limitation. If there are more all-day events specified in one day, they are ordered by subject alphabetically. The all-day events are described in chapter 1.8.4 All (multiple) day event in more detail.
Time-ranged events — repeated events, meetings, etc. If multiple events are defined for a day, they are ordered by the time when they were set.
The events of the same type are displayed in descending order according to their scheduled time.
The events in this type of view can be marked by different colors. These colors represent different event types and can be specified in the edit dialog box — chapter 1.8.2 Creating and editing events).
Each event can be moved to any other day in the week displayed. Click the selected event (after the pointer changes its shape to four arrows) and drag it to another location in the calendar.
Note
Only events with no recurrence set can be moved.
Today is marked by a box in the weekly view.
A new event can be created by double-clicking on a selected day. An event editing window will be opened with the date information automatically set to the selected day.
To display the previous or next week, use sliders on the right of the dialog box. Users can also use the thumbnail calendar icon next to the sliders. Click the icon to open the month calendar. The today is marked by a box. When another day in the calendar is clicked, the main display of the calendar is also switched to the selected day. To switch to today, click on . The current week is marked in the left corner of the bar.
This view type provides a comprehensible list of events where every single line stands for one event and includes relevant information. By default, events are ordered by their starting dates. The list of events includes all items where no recurrence is set.
This view mode can be helpful especially when a particular event is searched since it allows ordering of the items by simple clicking on a particular parameter's header. Click the heading again to change the order from ascending to descending and vice versa.
By default, up to 20 events are listed on one page. To change number of events displayed on a single page, edit the settings in Kerio WebMail (see chapter 1.13.1 User Settings).
The information to be displayed in the list can be chosen. Sometimes it is better to hide some columns in order to make the navigation easier, sometimes showing more columns is desired. Right-click the column heading to open the dialog box with column selection. The pop-up menu that appears contains the Change columns option.
TIPS
If using meetings, it may be useful to show the column with the attendees, to view who has been invited.
To see the duration of each event, show the Duration column.
The column settings apply to the event list as well as the list of repeated events.
The column width can be modified in the event list. To change the column width, click between two columns in the table header and drag the cursor right or left as needed.
Events are all items created in the calendar. New events can be added in a special create-and-edit dialog. To open this dialog, use the button on the toolbar or the corresponding option available in the context pop-up menu (opened by right-clicking on the calendar's main panel).
Meetings are special events. This event is shared by multiple participants (invited users). For details on how to create a meeting, see section 1.8.7 Appointments.
Some events and meetings can be repeated in regular periods. To set periods of repetition for an event, click on . When recurrence is set for an event, the item will be repeated in the calendar according to the settings. For detailed information, read chapter 1.8.5 Recurred event.
Use the General tab to define basic configuration (see figure 1.47 Event settings):
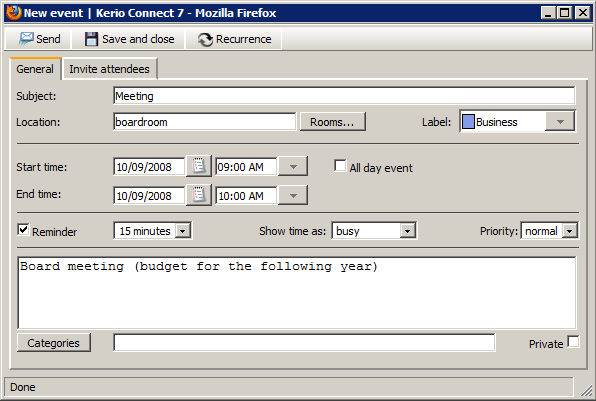
- Subject
The summary information about the event. This information will be displayed in the calendar window after the event is saved, therefore it should be as brief as possible.
- Location
Location of the event.
If you use the resource scheduling feature in your company, clicking on lists all rooms available for reservation.
- Label
Use this menu to specify the type of event. A specific color next to the description represents the type of event. The same color will be also used to mark the event in the calendar.
- Start time
Start time of the event.
- End time
End time of the event.
- All day event
In the All day event, the start and end time items are missing. This means that this event will be in progress over the entire day, but other events can be still planned for this day. The typical example is setting entire-day events like wedding anniversaries, symposiums, vacations, business trips, etc.
- Reminder
Reminder is a special function of the Kerio WebMail interface that allows reminding of events. If the reminder is set for an event, an alert is displayed at the defined time that informs of an upcoming event(s). The default alarm time is set to 15 minutes, but any different value can be selected from the drop-down list. To cancel the reminder, simply disable the option in the event's edit dialog box.
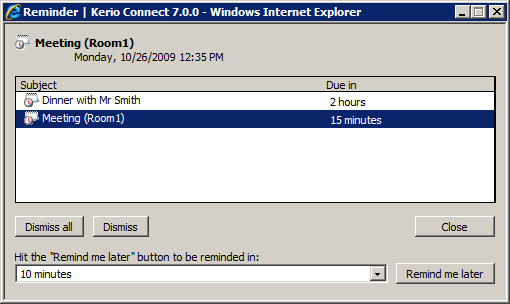
The event reminder (see figure 1.48 Reminder) is displayed as an alert window including a list of upcoming events. Each row contains the subject of the specific event (task) and time left to the upcoming event.
Note
Besides events, it is also possible to use the reminder for Tasks. Therefore, a single alert window may contain both events and tasks if their reminder time is the same.
It is also possible to set another interval for later reminder of the event. This might be helpful especially when you have no time to focus to the event's subject at the particular moment. Set the desired time to the next reminder (from five minutes to two weeks) in the pull-down menu in lower part of the window and click .
It is also possible to double-click on the alert window to view the event.
Click the / buttons to cancel the selected reminder or all reminders. The dismissed reminder will not be displayed any more unless it relates to a repeated event.
Warning
The reminder window is active only when Kerio WebMail is running.
Alerts are displayed only if reminders are set in the default personal Calendar and Tasks folders (default folders which are created with each user account). Reminding alerts are not displayed for custom calendar and task folders.
- Show time as
In this item, users can select the state of the user during the time of the event. Three status modes are available: free, tentative, busy and out of office. Selecting the state is useful e.g. when the Free/Busy server is used for scheduling and communication (for more details on this topic, see chapter 1.8.7 Appointments).
- Private
The Private option allows hiding of the event in case the calendar is shared with other users. Events set as private cannot be viewed by other users (for details, see chapter 1.8.3 Private Events).
- Comment
To any event it is possible to add a comment referring to various issues such as event details or lists of items related to the event.
- Categories
The Categories item is useful only if the web interface is used in connection with MS Outlook with Kerio Outlook Connector preinstalled. Use the tools in this application to display the events in individual categories.
Click the button to display the list of default categories. Users can also create new categories that are more suitable.
Events are private when they are set as Private. This feature allows to hide private events in shared calendars. The users with whom the particular event is shared cannot view its content, edit it or remove it. Such users will see only the item labeled as Private event. The only information these users learn from the calendar is date and time.
Note
In the Free/Busy calendar, the level of busyness and the time of private events are available.
Private events can be created as follows:
Open the New event dialog box.
Insert relevant information.
On the Settings tab, enable the Private option (see figure 1.47 Event settings).
Save changes by clicking .
Warning
Private events are treated as private only if the client where the private event calendar is viewed supports this feature. In other client applications, it is possible to view and edit events without any restrictions by users with appropriate access rights. This implies that information included in private events are not well secured.
All-day events are special events useful especially when the user leaves for a business trip for one or more days, when we want to note someone's birthday, etc.
All-day events may be 24, 48, 72, etc. hours long and it is only bond to particular date(s). All-day events are always displayed above the other, time-anchored events of the day (see figure 1.49 Month view events). This type of event is not included in the day schedule because users can add other types of time-limited events in the day schedule. No starting or ending time is specified for all-day events.
To set the all-day event, check the All day option in the dialog box for creating an event (see picture 1.47 Event settings).
All-day events are not moved according to time zones since they are bound to date, not to particular time. This means that if for example an all-day event is set for December 24, 2006, this date will be kept for all time zones. For details regarding behavior of events in different time zones, see chapter 1.15 Time zones.
The multiple-day event is created the same way as the all-day event, but the time range must be specified in the Start and End fields in the event's edit dialog box.
Examples of multiple-day events are multi-day business trips or vacation.
Note
Multi-day events can also be created by non-checking the All-day option and simple setting an event for more days. The only difference in the layout may arise from frequent trips to various time zones, as events can be moved accordingly to the current time zone. To learn more on behaviour of events in different time zones, read chapter 1.15 Time zones.
For periodically repeated events the Repeat mode can be set. This feature enables for example setting of regular company briefings or regular Thursday Scrabble parties with friends. Simply define the event once and set its repetition. To set recurrence of an event, click the icon in the top-left of the Edit event dialog box.
Various types of recurrence periods are available —daily, weekly, monthly or every year. Range of the recurrence (validity) can be also set. Just set an initial and the final date.
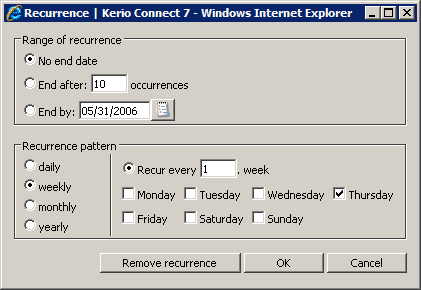
- Range of recurrence
Set the desired range of recurrence.
No end date — the event will be repeated for an unlimited period (useful for birthdays, anniversaries, etc.).
End after ... occurrences — the recurrence is over when the specified number of recurrences is reached.
End by — the repetitions will occur during the specified time range (including the end date).
- Recurrence pattern
Several recurrence patterns are available (daily, weekly, monthly and yearly). For each one, different parameters can be set in the right part of the dialog.
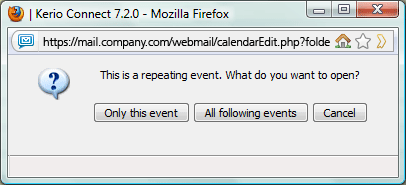
If an event is set as repeated, it may need to be edited to change or remove any of the occurences. You can simply do it in the calendar of the particular event as follows:
In the calendar select the event occurence day to be changed.
Double-click on the event to open a dialog box where you can select whether to change only the particular occurence or all the following occurences as well (see figure 1.51 Editing a repeated event).
Removing Events:
If the event includes multiple participants, it is possible to check the corresponding option to Inform users/organizer that the event has been canceled. Kerio Connect then informs all participants about any changes by email.
Edit the event, confirm changes and save. A crossed icon appears next to the event.
Warning
If you choose Only this event, possible changes will later not be reflected in other occurences of this event.
If you change an event which you did not create and the original creator updates this event, your changes will be overwritten.
Note
If your calendar is currently set to the Daily View, you can change events by dragging them with your mouse. In such case, the repeated event will be changed in your calendar only, which means that other participants including the organizer will not be informed about this change.
Meetings are special events where email addresses of other participants can be involved. Once a meeting is created, addresses can be added to which the message will be sent — these special messages are called invitations. Invitations are special messages informing users of topics, times and place of a meeting. Invitations include special accept/reject buttons.
Information derived from the participant's reaction is sent to the meeting initiator (chair member). The initiator thus know whether the persons invited come or not.
It is also possible to send updates related to meetings when the initiator modifies the invitation.
In addition to the option of creating of meetings, meeting scheduler tools are also included in Kerio WebMail. If participants are added who also use a Kerio Connect account, meetings can be scheduled in accordance with free time information available in calendars of these users.
Meetings are created in the same way as events. Simply open a dialog where an event can be edited and specify corresponding parameters in the General tab (for more information, refer to chapter1.8.2 Creating and editing events). Then create a list of attendees who will participate in the meeting. This can be done on the Attendees tab.
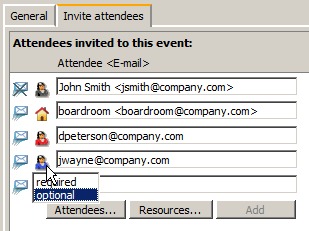
By default, the Attendees section includes only the name of the meeting initiator. Use special buttons to add more attendees (see picture 1.52 Attendees). Several types of attendees can be created:
Required — this group includes invited persons who should not miss the meeting from any reason. The invitation includes this information so that each user addressed knows if their presence is required or not.
Optional — this group includes users who can decide whether to come or not.
Source — special type of attendee. To learn more on resources and their reservation, read section 1.8.8 Resources.
There is also the chair attendee, a special attendee type. This member cannot be changed. The chair attendee is the appointment's founder.
Attendees can also be divided between those to whom the invitation will be sent and the others. It is also possible to create meeting and include attendees without sending them any invitation. By default, however, sending of invitations and meeting newsletters is enabled.
Below, you can find instructions on how to create a list of attendees:
Two buttons located below the list can be used to add attendees (see figure 1.52 Attendees):
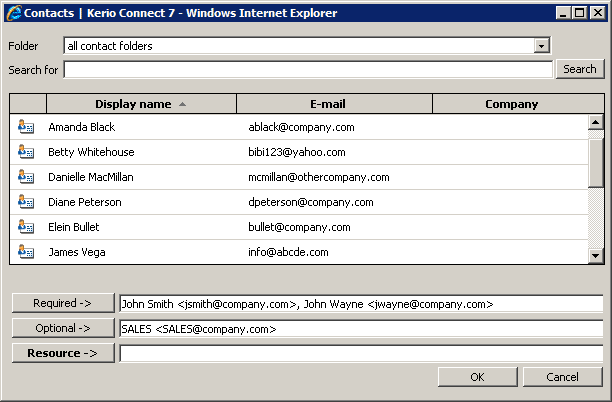
Use the and buttons to browse for attendees and resources in contacts (see figure 1.53 Select). Look up and select addresses of resources or attendees you want to add.
The dialog contains the following items:
- Folder
The menu includes all contact folders in the mailbox (including public and subscribed contacts).
- Search for:
Enter a string which will be used as search criteria, i.e. any addresses including the string will be searched. First letters of first or second name or username (the part of address preceding the at-sign) can be used as the string. The search string is not case-sensitive.
One or multiple addresses can be selected from the list (by left-clicking while holding the
Ctrlkey), or the , a buttons can be used to add selected addresses.Note
Addresses can be also added to the attendee list by double-clicking on a particular item. The address is filled in the active entry. At figure 1.53 Select, the is currently active. The button name preceding the active entry (, or ) is bold. You can switch between entries by clicking on a particular textfield.
Once attendees are selected, save settings by the OK button. The dialog is closed and all selected addresses are listed. Various icons are used to mark attendees as required, optional or resource. Roles of attendees can be changed (see figure 1.54 Setting an attendee's status)
Use the button to add users to the list by hand. In case you know the particular email address by heart, this method is the fastest one. The button can also be used if the address we intend to add is not included in our contact lists.
The button is not active unless there is at least one line blank where another address can be added. Once addresses are filled in all entries, the button is activated so that another line can be added.
To set or change attendee type, simply click on the attendee icon in the list and perform the settings (see figure 1.54 Setting an attendee's status).
To enable/disable sending of invitations and updates to individual users, simply click on the envelope icon next to the particular user's name and set an appropriate option in the menu (see figure 1.55 Sending an email message to an attendee). Simply choose yes to send the invitation or no not to send it.

When inserted, events can be sent to attendees or just saved by the and buttons provided on the toolbar.
Only the event organizer can update or cancel appointments. Other attendees will be informed about the change by email.
In the event list, select the event to be edited double-click it to open the Edit event dialog box. Change what you need to change and send the update to the attendees.
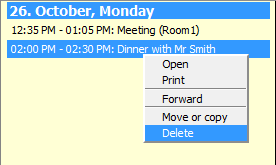
To cancel the event, select Delete in the context menu (see figure 1.56 Deleting events). You can also select an event and use the Delete key to remove it.
As denoted right at the start of this chapter, a special tool is provided for time scheduling. It is known as Free/Busy calendar and it might simplify creation of meetings. Thanks to the Free/Busy calendar feature, it is easy to find out whether participants invited to the meeting are free or busy in the time scheduled by comparing the meeting date and time calendars of these users. It is, therefore, easier to find a time range where all attendees required to participate in the meetings are free. This feature help us avoid many phone calls and emails that we would otherwise make or send.
Free/Busy calendar exploits information on user's free time from the calendar of the particular user. However, the meeting initiator can only see when the attendee is free or busy. It is not possible to view particular details on the user's activities.
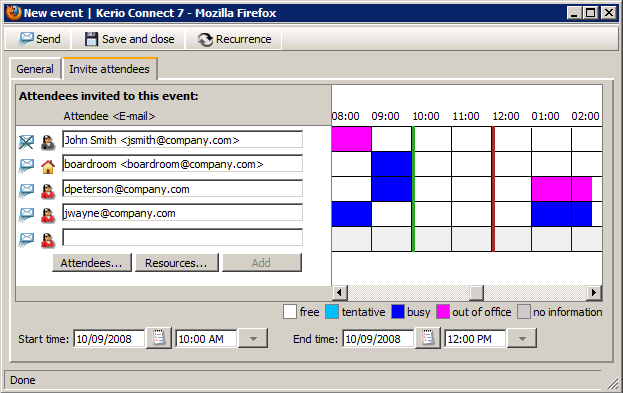
Free/Busy calendar is displayed in the event's edit window on the Attendees tab in the section addressing meetings. The Free/Busy calendar is enabled automatically when attendees are entered in the list. To the right from the list, you can find the Free/Busy calendar (see figure 1.57 The free/busy data of the users).
The Free/Busy calendar also provides information on how much busy the user is. Degree of user's busyness is suggested by the color. Color key is provided below the Free/Busy calendar.
The Free/Busy calendar displays all meetings and events included in the default calendar folder and its subfolders. If you want that some events (e.g. items of a private calendar) are not shown in the Free/Busy calendar, create a new calendar folder out of the branch of the default calendar and its subfolders.
Warning
Free/Busy information is displayed only for attendees with an account in the Kerio Connect (usually, this function is used to set meetings with colleagues). The information is not displayed for external attendees (as shown at figure 1.57 The free/busy data of the users).
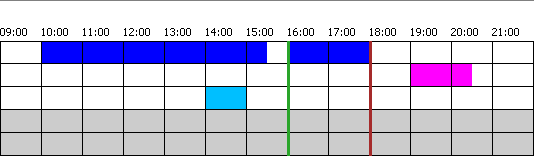
As shown at figure 1.57 The free/busy data of the users, Free/Busy is kind of a timeline. Each Free/Busy line shows freetime information related to a particular user. Coloured parts refer to time segments when the user is busy or free. The two vertical lines (a green and a red) show where the meeting we are setting starts and ends. Ideal conditions are when no coloured field interferes with the range set by the two lines. Both lines can be moved within the timeline as needed. To move lines, use the Start time and End time fields located below the timeline section. These fields are interconnected with fields of the same names on the General tab. This implies that if these items are change on either of these tabs, the values are automatically copied to the twin items.
Now, let us see the attendee's view of Free/Busy To make the Free/Busy information as relevant as possible, the following conditions should be met:
Each user should use their Calendar folder and include all their events in it.
Degree of busyness should be set in the Show time as menu (see figure 1.58 Setting of busyness level) of the event's edit dialog.
In the Show as menu, the following options can be specified:
- free
Such event is not displayed in the Free/Busy calendar. Use this mode when you can be interrupted while completing a task or for entire-day anniversary events.
- tentative
This event is highlighted by a light blue color in the Free/Busy calendar. This option may be useful especially for events where time settings can be changed if needed.
- busy
This event is highlighted by a dark blue color in the Free/Busy calendar.
- absent
This event is highlighted by a pink color in the Free/Busy calendar.

The Free/Busy calendar works only for users of one Kerio Connect application. Other users will be displayed in grey color, since there are no free/busy data available for them.
Short description of invitations was provided at the top of this chapter. In this section, we will focus on invitation's layout and on how to react when an invitation is delivered to your mailbox.
Invitations use a special icon, different from the one used for usual email messages (see figure 1.59 Acceptation or declination of a meeting). Upon clicking on an invitation, meeting information is shown along with several buttons. Name of the meeting is provided in the header (at figure 1.59 Acceptation or declination of a meeting, Meeting is simply set as the name). Below, you can find basic information such as when and where the meeting takes place and a list of attendees, both required and optional. If your name is included in the list of required attendees, you should accept the meeting. Otherwise, it is up to you whether you choose to participate in the meeting or not.
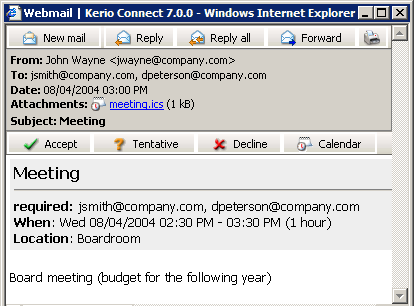
As soon as an attendee receives an invitation, the event is automatically added to their calendar as “tentative”. This lets anyone know that they may be an event scheduled for the particular time and the user might be unavailable.
Buttons located below the basic meeting information allow fast response, as follows:
— upon clicking on this button, an email message informing of acceptance of the invitation is sent to the meeting initiator and a green icon appears at the name of the name of the user who has accepted the invitation (the same icon as used on the Accept button in the invitation).
— upon clicking on this button, an email message informing of acceptance of the invitation is sent to the meeting initiator and an orange question mark icon appears at the name of the name of the user who has tentatively accepted the invitation (the same icon as used on the Tentative button in the invitation).
— upon clicking on this button, an email message informing of acceptance of the invitation is sent to the meeting initiator and a red cross icon appears at the name of the name of the user who has rejected the invitation (the same icon as used on the Decline button in the invitation).
Upon clicking on any of these buttons, a dialog box is opened where a message to be attached to the acceptation status notice can be entered. No additional information is required since the necessary data has already been entered by the moment.
In addition to the options described above, there is another button labeled as . This button opens a special dialog box including a one-day view of the calendar with the date and time of the meeting marked so the user can easily find out whether the event collides with another activity or not. This help us make an appropriate reaction.
Once the event is answered, the invitation is removed from the email folder and the meeting is marked in the private calendar if accepted.
Note
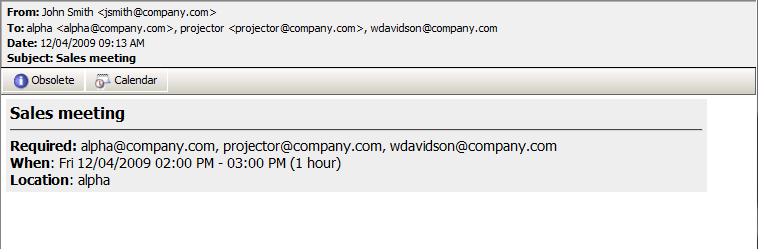
If the attendee accepts the updated invitation first, the original invitation gets obsolete automatically (see figure 1.60 Obsolete event).
In Kerio WebMail, resources are meeting rooms and devices (such as OHPs, whiteboards, cars, etc.) shared by multiple employees across the company. To make resources be as helpful and efficienly used as possible, resources and their reservations are managed by administrators. The resource management system is a part of Kerio Connect, fully available in Kerio WebMail.
Resources can be booked by using the existing calendar system. Resource reservation is based on creating of en event. The feature works similarly as appointment scheduling. The main difference is that the Attendees tab must include the resource selected from the contact list (it can naturally also include contacts of attendees). The Free/Busy shows whether the particular resource is available for the suggested time or not (details on Free/Busy calendars and on appointments are provided in section 1.8.7 Appointments).
Note
To make a resource available for booking, it is necessary to create it in Kerio Connect first. If you need to create a new resource, contact your network administrator.
To book a resource, follow these instructions:
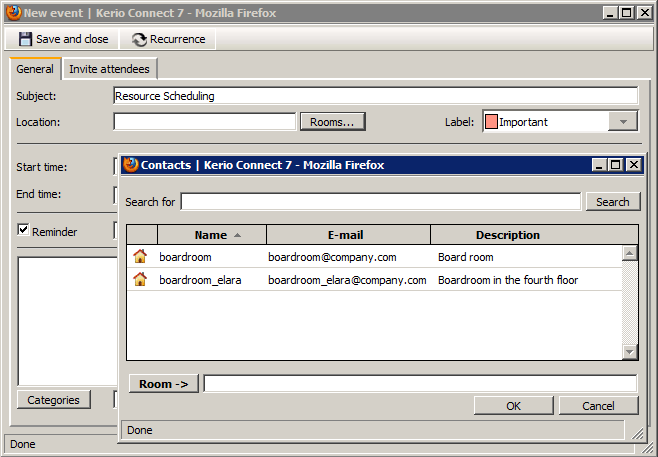
Open a new event and specify its subject on the General tab.
To reserve a room, click on and select the corresponding item (see figure 1.61 Booking rooms).
Another option is to switch to the Attendees tab. There you can enter the room in the same manner as you enter attendees.
Note
To check whether the room is not reserved yet for the desired time, go to the Invite Attendees tab and see the Free/Busy calendar for the information whether the event planned does not collide with another event already scheduled for this time.
To reserve a facility, switch to the Invite attendees tab and click on the button (see figure 1.62 Resource reservation). In the list, select a resource. There are both rooms and devices included in the list. In the right section of the dialog, you can see the item's Free/Busy information (information referring to the attendee as well as the resource). It is therefore easy to check right away, whether the source is free or already booked by another user for the suggested time.
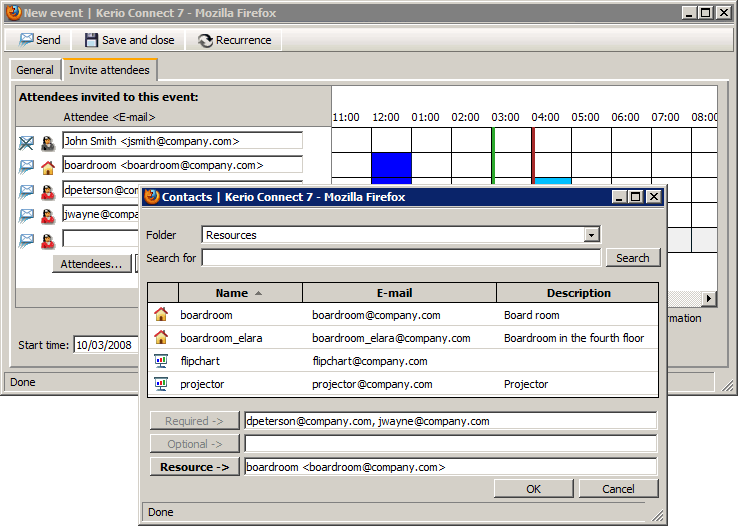
You may have noticed that there are also other attendees in the list shown in figure 1.62 Resource reservation. Resources can be reserved either for usual appointment or for meetings (see section 1.8.7 Appointments).
Each resource created in the system has its own calendar where all reservations are displayed. Calendars of individual resources can be subscribed through the standard sharing process (subscription of shared folders is focused in chapter 1.12.6 Folder subscription).
Most user can access resource calendars in the read-only mode. Resource calendars can be edited only by the resource manager. The role of resource managers and their rights are addressed in the following section.
In certain situations, it is necessary that a resource is booked even if it has already been reserved or that there is no other way than to make the reservation by a phone call. For such purposes, there exists a user with special rights who is a manager of the company resources and can access their calendars. Resource managers can access resource calendars with administration rights. This implies that they can edit, remove or move reservations in the particular resource calendar.
If you are a resource manager, first it is necessary to subscribe calendars of all resources that you would manage:
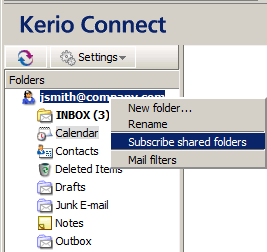
In the folder tree right-click on the root folder and select Subscribed shared folders in the pop-up context menu (see figure 1.63 Context pop-up menu of the root folder).
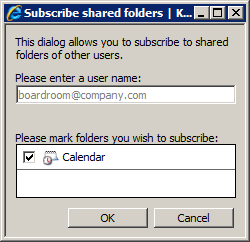
In the Subscribe shared folders dialog, enter the resource name and confirm specification by clicking on . Now subscribe the Calendar folder just displayed (see figure 1.64 Subscription of shared folders).
If you manage multiple resources, subscribe their calendars in the same way.
Once subscribed, calendars of individual resources are shown in the folder tree. Each resource calendar now shows all reservations of the particular item done by any users. The resource manager can edit reservation time, add new reservations or remove them if demanded.
Kerio WebMail allows forwarding of events in such a format so that it is possible to save it to the calendar directly. Thanks to this feature, it is not necessary to copy event data to email messages and to the event's edit dialog box at the addressee's side.
Kerio WebMail also supports another option. When a message with an event in the attachment is received, the recipient can simply click on the attachment to open the event in the standard event edit dialog box. Click on to confirm settings and save the event to the Calendar folder.
Note
To save an event or open it as an attachment, right-click on it and use one of the options available, Open or Save.
To forward an event, select it by the mouse pointer and click on the button on the calendar folder's toolbar (it is also possible to use the corresponding option in the pop-up context menu).
Select an event and click on a corresponding icon to open a message editor where the event is included as an attachment.[3] The message can be edited before it is sent.