In cooperation with Kerio Connect, Windows Mobile 5.0 AKU2 provides these features:
Windows Mobile 5.0 AKU2 supports the following folder types:
email
calendar
contacts
tasks
DirectPush Technology — this technology allows mobile devices to keep open HTTP(S) connection with the server. Whenever a new item is received or any change is performed in any folder, changes are synchronized immediately.
Kerio Connect supports Global Address Lookup — this feature allows to look up email addresses in all contact folders available to the particular user (including public folders).
Wipe — so called “wipe” allows Kerio Connect administrators reset remote devices. This reset clears all user data out of the device. Only default files and settings will be kept on the mobile device.
The following features of Windows Mobile 5.0 AKU2 are not supported by Kerio Connect:
Setting of security policy from the server (Enforce Security Policy)
SMS-based Always Up-To-Date (AUTD)
It is not necessary to install the ActiveSync application since it is included in the Windows Mobile operating system (it can be found under ).
Before the starting to configurate, it is necessary to check if connection of the device to network is set correctly (required for connection to the mailserver). This can be tested for example by using Internet Explorer to connect to Kerio WebMail (for details, see chapter 1.2 Authentication to Kerio WebMail).
If the connection does not fail, you can start to set the ActiveSync application:
In , use the ActiveSync icon (see figure 4.1 ActiveSync icon) to run the application.
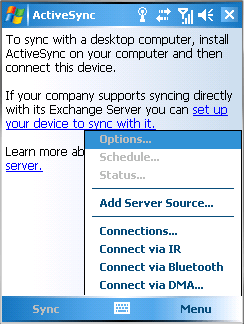
When setting the ActiveSync device for the first time, an informative tips are displayed to guide you through. Click on the set up your device to sync with it link.
If you already know how to set ActiveSync, open same dialog from (see figure 4.2 ActiveSync menu). This method can be also used whenever you need to change the configuration.
Note
In case that the ActiveSync application has already synchronized data with another mailserver, remove the settings by clicking on the button in (see figure 4.2 ActiveSync menu).
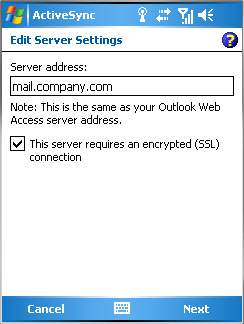
Tis opens the first page of the configuration wizard (see figure 4.3 ActiveSync — specification of a mailserver and setting secure traffic) used for specification of the Kerio Connect's Internet name.
The This server requires an encrypted (SSL) connection option allows encryption of any traffic between the server and the device. It is highly recommended to keep the option enabled to protect your connections from debugging and misuse.
To allow the encryption, it is required that an SSL certificate is installed on the device. If your company uses certificates authorized by a commercial certification authority, it is possible that your device already includes support for SSL encryption. If the company uses a certificate generated by Kerio Connect or another internal certificate, it is necessary to install another certificate on the device. For guidelines for this procedure, see section 4.2 SSL Certificates.
Once the server name is set and SSL encryption enabled, click on to open the following page of the configuration wizard.
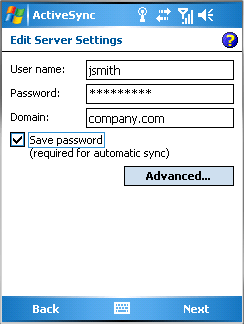
On the second page, set your login data (see figure 4.4 ActiveSync — user login data definition):
- User name
Use this entry to specify the user name used for authentication to Kerio Connect.
- Password
Use this entry to specify the password used for authentication to Kerio Connect.
- Domain
Use this textfield to enter the email domain name (usually it is the part of your email address after the
@symbol).- Save password
If you do not wish to be asked for the login data by each startup of the synchronization, enable this option. If you want to use the feature of automatic synchronization, this option is required to be enabled.
Note
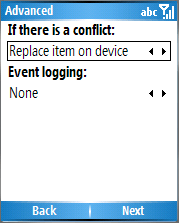
Besides login data items, the button is included in this dialog. It can be used to set optional parameters. The dialog allows to set measures to be taken in case that a collision occurs during the synchronization (see figure 4.5 ActiveSync — the Advanced dialog box).
Collisions might occur when some folders to be synchronized have been changed both on the server and on the device since the last synchronization. According to the parameters set here, ActiveSync will either beat the change performed on the server with the one applied on the device or the other way round. By default, the server beats the device. It is recommended to keep these settings.
Once the settings are done, click on .
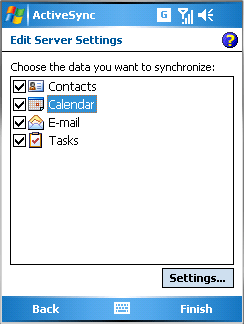
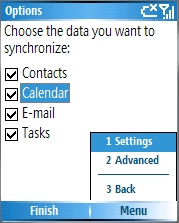
The following dialog provides a list of all folder types which can be synchronized (see figure 4.6 ActiveSync — folder synchronization settings). Check only those folders that will be synchronized and leave unchecked or uncheck the others.
The button also included in the dialog is active only upon clicking on the Calendar or E-mail folder and it opens a dialog where synchronization parameters for calendar and email folders can be set. The Contacts and Tasks folders do not contain any other parameters.
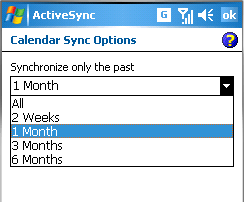
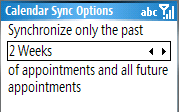
- Calendar Sync Options
Selection of the Calendar folder and a consequent clicking on opens a dialog with synchronization settings (see figure 4.7 ActiveSync — calendar synchronization settings). The dialog includes a menu where it can be set how old data will be synchronized.
New events will be synchronized without exception. However, to shorten the time needed for synchronization, it si possible to set the maximum age of events to be synchronized (it is not necessary to synchronize old data where the information will not be needed any longer).
By default, data up to two weeks old is synchronized. If you need to synchronized also older data, change the settings. In such a case, bear in mind that at least the first synchronization may take longer.
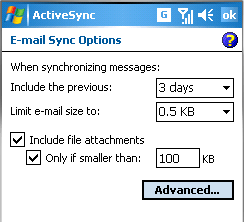
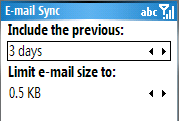
- E-mail Sync Options
Selection of the E-mail folder and a consequent clicking on opens a dialog with synchronization settings (see figure 4.8 ActiveSync — email synchronization settings). The dialog includes several options to customize synchronization:
Include the previous — this option allows to set how old messages will be synchronized. By default, messages up to three days old are included in the synchronization.
Limit e-mail size to — only messages of size up to the value set will be synchronized.
Include file attachments — if this option is enabled, attachments are also included in synchronization.
Only if smaller than — the value entered in this option sets the maximum size of email attachments to be synchronized. Larger attachments are excluded from synchronization.
The settings described above help decrease time needed for synchronization as well as the load of the synchronization on network connection.
Once the settings are done, save the configuration by clicking on . Now, the first synchronization between the device and Kerio Connect will be started.
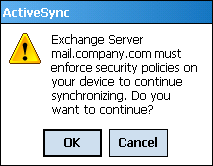
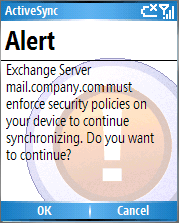
During the synchronization, a dialog appears requiring confirmation of appliance of the security policy (see figure 4.9 Wipe confirmation). Use the button for confirmation, otherwise the synchronization will not be completed correctly.

Other ActiveSync settings are focused in your device's user's guide.
It is not necessary to install the ActiveSync application since it is included in the Windows Mobile operating system (it can be found under ).
Before the starting to configurate, it is necessary to check if connection of the device to network is set correctly (required for connection to the mailserver). This can be tested for example by using Internet Explorer to connect to Kerio WebMail (for details, see chapter 1.2 Authentication to Kerio WebMail).
If the connection does not fail, you can start to set the ActiveSync application:
In , use the ActiveSync icon (see figure 4.10 ActiveSync icon) to run the application.
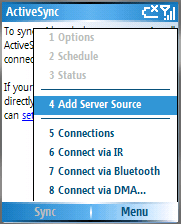
Click on and select Add Server Source (see figure 4.11 ActiveSync menu).
Note
In case that the ActiveSync application has already synchronized data with another mailserver, remove the settings by right-clicking on the (see figure 4.11 ActiveSync menu).
This opens the synchronization's configuration wizard.
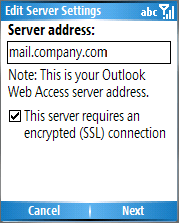
On the first page of the wizard, use the Server address entry to specify the server's Internet name (see figure 4.12 ActiveSync — specification of a mailserver and setting secure traffic).
The This server requires an encrypted (SSL) connection option allows encryption of any traffic between the server and the device. It is highly recommended to keep the option enabled to protect your connections from debugging and misuse.
To allow the encryption, it is required that an SSL certificate is installed on the device. If your company uses certificates authorized by a commercial certification authority, it is possible that your device already includes support for SSL encryption. If the company uses a certificate generated by Kerio Connect or a certificate signed by an internal authority, it is necessary to install another certificate on the device. For guidelines for this procedure, see section 4.2 SSL Certificates.
Once the server name is set and SSL encryption enabled, click on to open the following page of the configuration wizard.
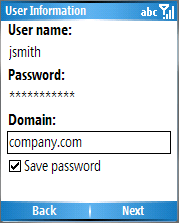
On the second page, set your login data (see figure 4.13 ActiveSync — user login data definition):
- User name
Use this entry to specify the user name used for authentication to Kerio Connect.
- Password
Use this entry to specify the password used for authentication to Kerio Connect.
- Domain
Use this textfield to enter the email domain name (usually it is the part of your email address after the
@symbol).- Save password
If you do not wish to be asked for the login data by each startup of the synchronization, enable this option. This option is required to be enabled especially if you want to use the feature of automatic synchronization.
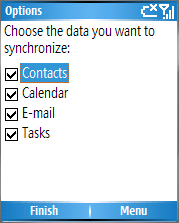
The following dialog provides a list of all folder types which can be synchronized (see figure 4.14 ActiveSync — folder synchronization settings). Check only those folders that will be synchronized and leave unchecked or uncheck the others.
Synchronization of email and calendar allows additional settings. Select Calendar or E-mail and click on . In the menu just opened, select Settings (see figure 4.15 Folder synchronization settings — Menu). This opens a dialog providing options in accordance with type of item to be synchronized:
- Calendar Sync Options
The Calendar Sync Options dialog (see figure 4.7 ActiveSync — calendar synchronization settings) includes a menu where is can be set how old data will be synchronized.
New events will be synchronized without exception. However, to shorten the time needed for synchronization, it si possible to set the maximum age of events to be synchronized (it is not necessary to synchronize old data where the information will not be needed any longer).
By default, data up to two weeks old is synchronized. If you need to synchronized also older data, change the settings. In such a case, bear in mind that at least the first synchronization may take longer.
- E-mail Sync
The E-mail Sync dialog (see figure 4.8 ActiveSync — email synchronization settings) includes two parameters to be customized:
Include the previous — this option allows to set how old messages will be synchronized. By default, messages up to three days old are included in the synchronization.
Limit e-mail size to — only messages of size up to the value set will be synchronized.
The settings described above help decrease time needed for synchronization as well as the load of the synchronization on network connection.
Before closing the wizard, click on the button (see figure 4.15 Folder synchronization settings — Menu) and select the Advanced option. It allows setting of optional parameters. The dialog allows to set measures to be taken in case that a collision occurs during the synchronization (see figure 4.18 ActiveSync — the Advanced dialog box).
Collisions might occur when some folders to be synchronized have been changed both on the server and on the device since the last synchronization. According to the parameters set here, ActiveSync will either beat the change performed on the server with the one applied on the device or the other way round. By default, the server beats the device. It is recommended to keep these settings.
Once the settings are done, click on and consequently on the button to save settings.
Once the settings are done, save the configuration by clicking on . Now, the first synchronization between the device and Kerio Connect will be started.
During the synchronization, a dialog appears requiring confirmation of appliance of the security policy (see figure 4.19 Wipe confirmation). Use the button for confirmation, otherwise the synchronization will not be completed correctly.

Other ActiveSync settings are focused in your device's user's guide.