In the list display, information to individual contacts are listed in rows. Each line includes a contact and associated information available (e.g. email address, phone numbers, etc.). Columns display detailed information for contacts. Each column enables sorting contacts by information. Click the header of the selected column to sort contacts in ascending or descending order alphabetically, by numbers or by date (depending on the contents of the selected column).

You can mark individual contacts by clicking the checkbox at the beginning of each row. If you want to check all contacts in the list, click the All checkbox. When multiple contacts are checked, you can perform various operations with all the contacts at once. After checking the contacts, select any from the operations in the menu under the contact list to apply it to all contacts selected.
Actions:
- Move to folder
The checked contacts will be moved to a selected folder.
- Copy to folder
The checked contacts will be copied to a selected folder.
- Delete
Selected contacts will be removed or moved to Deleted Items, depending on setting of the Delete messages permanently option (for details, see section 2.5 User Settings).
- Send message
A dialog box for composing new message is opened and the addresses of the selected contacts are added to the To field.
- Add to distribution list
All selected contacts will be added to the distribution list. Click OK to open a menu and choose a distribution list where selected contacts will be added.
When performing an action for one contact only, you can click any of the icons in the Action column in the contacts list. Use the Action column icons to reply to the contact address, edit the contact, add the contact to the distribution list or delete the contact from folder.
Click the email address in the contact list to open the form for creating a new contact (see picture 2.9 New mail). The address of the selected contact appears in the To field.
To create a new contact, click on the link and fill in the details in the dialog box. If a comment is added in the dialog, the “i” icon will be added in the contact list. After you place your cursor on an email address, a comment will be shown (see picture 2.13 Contacts list).
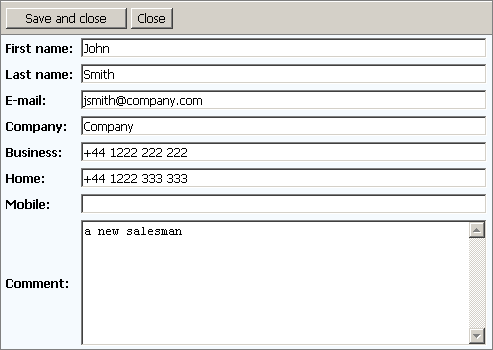
Click the button in the upper left corner of the dialog box to save the created contact.
Distribution lists are groups of email addresses used for sending of collective email. Simply use a special dialog in Kerio WebMail to complete desired email addresses and save them under a common name. Whenever sending an email message to such a group, simply enter the distribution list name instead of filling in individual addresses.
Distribution lists are helpful if email is often sent to a group of addressees. For example, it can be a group of people with whom you often communicate in your work or outside the office, as shown at figure 2.15 Distribution list (it is a certain alternative to mailing lists or to group addresses).
A new distribution list can be created in any contact folder, as follows:
Open any contact folder.
Select the option on the toolbar.
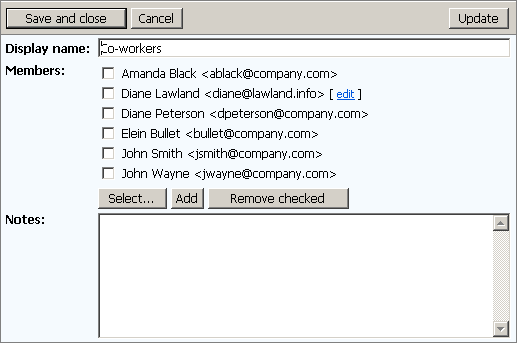
This opens a dialog where a new distribution list can be created (see figure 2.15 Distribution list) and where email addresses can be added.
Enter a name for the distribution list in the Name entry.
Add contacts to the distribution list. The and buttons can be used for this purpose:
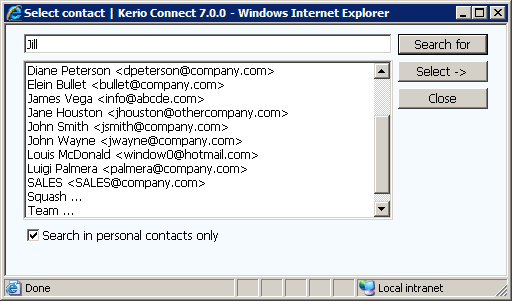
The button opens a dialog where addresses can be looked up and selected in contact folders. This button is available only if JavaScript is enabled.
The dialog contains the following items:
- The Search for entry
Fill in a string that will be used as the search criteria. It is possible to search by first and second names as well as display names (full names) or by email addresses. Simply enter the first letters of the first name, second name or user name. Click on Search. The first 200 contacts matching the string are displayed (or less). Usually, the list of contacts found is narrower, so it is easy to choose the contact we have been looking for.
- Contacts list
You can also use contact list to select existing contacts. Unless a particular string is being searched, contacts of all folders set in Kerio WebMail's user settings are displayed in the dialog.
To add a contact to the distribution list, select it with the mouse pointer and click on . Individual contacts as well as contact groups (i.e. user groups sharing one email address) and other distribution lists can be added to a distribution list.
One or multiple contacts can be chosen in contact lists (by holding the
ShiftorCtrlkey and selecting items by the mouse pointer) and then added to the distribution list by the button.- Search in private contacts only
If this option is enabled, the search will not be performed in any public contact folders. In such a case, only private folders and subfolders are searched through. Enabling of this option may speed up the search under certain circumstances, especially where public contact folders are large.
When done, simply click on to close the dialog.
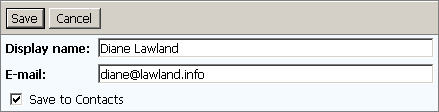
If you want to add a contact which is not saved in any contact folder yet, use the button. In the dialog just opened, enter the first and second name and email address:
- Name
Enter first and second name of the new distribution list member.
Enter email address of the new distribution list member (required).
- Save to contacts
Enable this option to save member information also in the Contacts folder.
A note can be attached to any distribution list. It can be for example a description of the group or another information. The note can be defined on the Notes tab of the distribution list dialog.
Save changes by clicking .
Once created, distribution lists are saved in the contact folder where they can also be managed.
Contacts, groups (group of users with a shared email address) or other distribution lists can be later added to a distribution list. Two methods can be used to achieve this. First, open a distribution list and add an address in the same way as when creating a list. Second, select contacts in a contact folder, in the Selected contacts menu select the Add to distribution list option and confirm settings by clicking on .