In MS Outlook, a special tool can be used for scheduling of meetings (details on what meetings are and how they are used, see section 1.8.7 Appointments). This tool is called Free/Busy server. MS Outlook extended by Kerio Outlook Connector allows using of the Kerio Connect's built-in Free/Busy server.
The Free/Busy server helps the meeting initiator schedule their events for times when invited attendees are free (the meeting does not collide with any other event in their calendars). It is, therefore, easier to find a time range where all attendees required to participate in the meetings are free. This feature help us avoid many phone calls and emails that we would otherwise make or send.
Free/Busy server exploits information on user's free time from the calendar of the particular user. However, the meeting initiator can only see when the attendee is free or busy. It is not possible to view particular details on the user's activities.
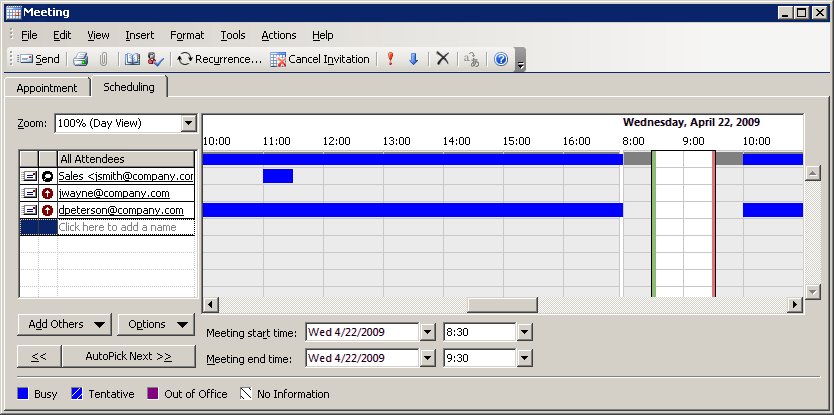
Free/Busy information is displayed in the event's edit window on the Scheduling tab in the section addressing meetings. Free/Busy is enabled automatically when attendees are entered in the list. To the right from the list, you can find Free/Busy information (see figure 6.24 Usage of the Free/Busy calendar).
The Free/Busy feature also provides information on how much busy the user is. Degree of user's busyness is suggested by the color. The color key is shown at the bottom of the window.
Warning
Free/Busy information is displayed only for attendees with an account in the Kerio Connect (usually, this function is used to set meetings with colleagues). Such an information is not displayed for external users.
The Free/Busy calendar displays all meetings and events included in the default calendar folder and its subfolders. If you want that some events (e.g. items of a private calendar) are not shown in the Free/Busy calendar, create a new calendar folder out of the branch of the default calendar and its subfolders.
Meetings are created in a similar way as events:
Open a new event dialog to enter subject and site where the event (meeting) will take place.
Switch to the Scheduling tab
and enter individual participants of the meeting (see figure 6.24 Usage of the Free/Busy calendar). Once participants are added, their free/busy calendar items relevant for the particular time set for the meeting is displayed. Level of user busyness is shown by the blue color (unfortunately, MS Outlook does not support viewing of busyness level). The users with no data on the free/busy server (users with no account, users that do not use the calendar) are marked with grey.
Warning
It is necessary to specify each user by their usernames and domains (
username@domain). Aliases cannot be used to display Free/Busy information.The slide window in the schedule shows the time of the suggested meeting marked by a green and a red vertical lines where the time range starts and ends. The window can be moved, extended or narrowed by the mouse pointer.
Warning
For successful authentication to Free/Busy server, specify the Subject item in the Appointment tab.
Traffic between the Free/Busy server and MS Outlook can be secured by SSL encryption. This requires SSL encryption to be enabled in the account settings and the Kerio Connect's SSL certificate to be installed. For this purpose, you can use either a certificate issued by a trustworthy certification authority or a so-called self-signed certificate which can be generated in Kerio Connect (for details on certificates as well as their creation and authorization, refer to Kerio Connect 7, Administrator's Guide).
- Enabling SSL traffic in account settings
In email account settings (under ) on the Advanced tab, enable the Secured connection (SSL) option.
Warning
This setting applies to any traffic performed between the account and Kerio Connect. All traffic is encrypted if the Secured connection (SSL) option is enabled.
- Enabling SSL traffic in account settings
In account settings (under ) on the E-mail tab, click on the Kerio Connect (KOC Offline Edition) account and in the account settings on the Server Details enable Use secured connection (SSL).
- Installation of the certificate in Internet Explorer
Run Internet Explorer and specify the corresponding URL to login to the Kerio WebMail interface. SSL-secured protocol must be used for the connection to the server. This implies that the URL should start with
https://(example:https://mail.company.com/).A window reporting the certificate issue is opened. Click on Continue to this website (not recommended) to open the Kerio Connect Administration/WebMail login page.
To avoid future certificate issues, it is necessary to install the certificate. Click on the Certificate Error → View Certificate option next to the welcome page URL. Use the button to start the installation wizard. When finished, the certificate gets installed.
In the dialog with certificate details displayed, click on the button.
A certificate installation wizard is opened. There is nothing to be set in the wizard. Simply confirm all settings and close the wizard to install the certificate.
The other option is to download the certificate from page Integration with Windows/Mac/Linux. A link to this page can be found on the Kerio Connect WebMail login page. Click on Download SSL certificate to save or install the certificate on your computer.