Installation of the Kerio Outlook Connector for Kerio Connect is performed by the installation wizard. Once the Kerio Outlook Connector installation is completed, it is necessary to set a profile and an email account manually.
Warning
First, it is necessary that MS Outlook has been installed and at least once started on the computer. Then you can install the Kerio Outlook Connector. otherwise the application will not function properly.
When the upgrade or downgrade of MS Outlook is performed, Kerio Outlook Connector must be reinstalled manually.
The user profile is a file where personal information in MS Outlook is stored. Profiles are applied especially under the following conditions. either the computer is accessed by multiple users and each of them needs his/her own email address and personal settings or a user can access multiple mailboxes and wants to use different personal settings for each of them. Settings for a new profile can be configured in the menu:
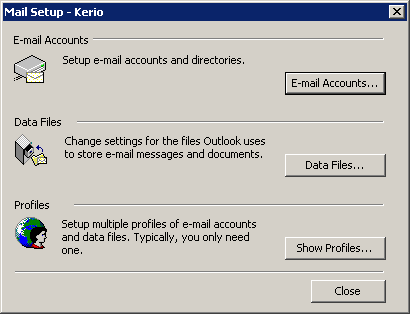
In the just opened Mail Setup — Outlook dialog, click on (see figure 6.1 Profile setup).
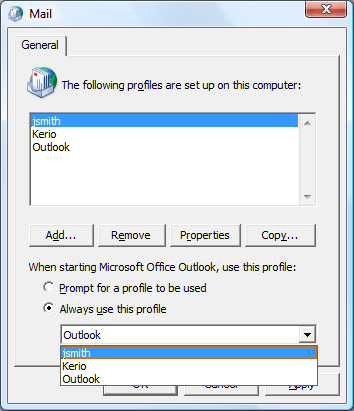
The Mail dialog is opened (see figure 6.2 Creation of a profile) where profiles and user accounts may be administered.
Click on . A dialog box is opened with a blank entry for specification of the new profile's name. You can enter any profile name you wish. Then, confirm settings by clicking on .
The new profile is empty (i.e. no email account is created in it). Therefore, the wizard where a new account can be created is started automatically once a new profile is created.
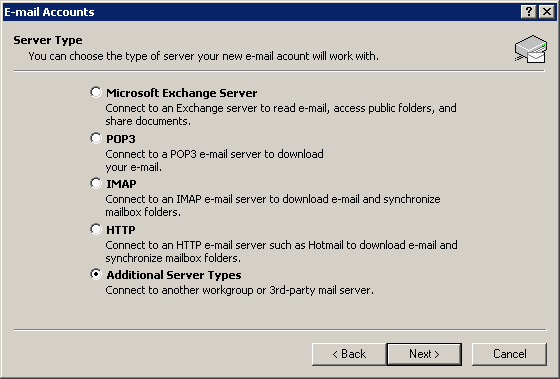
On the first page of the wizard, check Manually configure server settings or additional server types and click on .
The next step allows selection of a server type. Select Other → Kerio Connect (see figure 6.3 Account settings — server type selection) .
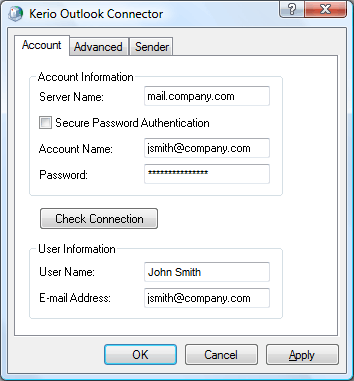
In the next step, a window with three tabs allowing configuration of the Kerio Outlook Connector is opened (see figure 6.4 Account settings — connection settings):
- Server Name
DNS name or IP address of the mailserver.
- Secure Password Authentication
This option allows using the NTLM authentication. When checked, users are not required to set usernames and passwords — the authentication will be used instead.
In order for the NTLM authentication to be functional, both the computer as well as the user account have to be parts of the domain used for authentication.
Warning
NTLM (SPA) can be used only if Kerio Connect is installed on Windows operating systems.
- Username
Username used for logging to the mailserver. If the user does not belong to the primary domain, a complete email address is required (
jwayne@company.com).- Password
User password.
Press the button to test if correct user data has been specified and if the connection to Kerio Connect works properly. If the test is finished successfully, a corresponding User Name and Email Address are automatically filled in.
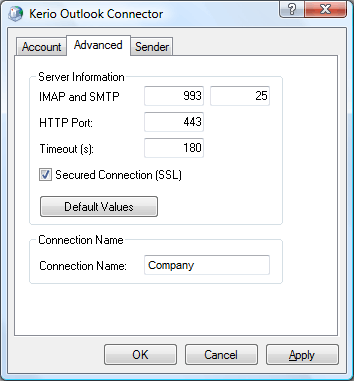
Use the Advanced Settings tab to change some of the communication settings.
- IMAP and SMTP port
Ports used for communication with the server by IMAP and SMTP protocols. The port numbers must be the same as the port numbers set in Kerio Connect.
- HTTP port
The HTTP(S) protocol uses the Free/Busy calendar and applications for automatic updates of Kerio Outlook Connector. Port number must be identical with the port number for the HTTP(S) service used by Kerio Connect.
If you want to use SSL-secured HTTP protocol, it is necessary to install a trustworthy certificate on the client station (details on its installation are provided in chapter 6.9.1 Creating a meeting using the Free/Busy server).
- Timeout
Time spent by the application waiting for a response from Kerio Connect.
- Secured Connection (SSL)
This option enables the SSL-encrypted communication using IMAP, SMTP and HTTP.
Warning
The settings of this option apply generally to all protocols. It is not possible to enable encryption for separate ones.
The button changes all settings to their default values.
- Connection name
Kerio Outlook Connector Store is used by default. This name can be changed.
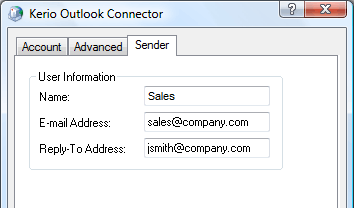
Name and its visibility, email address and a Reply-To address can be set in the Name tab.
- Name
The name that appears in sent email messages.
- Email Address
The email address from which the messages are sent.
- Address for replies
Address to which replies will be sent (the
Reply-To:item).Note
If Outlook 2000 is used, changes performed on the Sender tab will take effect after a restart of the application.
Click to confirm and save the settings and to close the wizard. The profile created can be found in the list provided on the Mail page. Now, two options of profile modes are available (see figure 6.2 Creation of a profile):
Always use this profile — this option sets the new profile as default. Then, the profile including the new account is opened automatically upon each startup of MS Outlook.
Prompt for a profile to be used — if this option is used, a menu is opened providing a list of all profiles (see figure 6.7 Choose Profile). Upon each startup of MS Outlook, one of these profiles can be selected.
Warning
Each MS Outlook profile may be used only by one account connected via Kerio Outlook Connector. Functionality of POP3 and IMAP accounts located in the same profile is not affected by the Kerio Outlook Connector Store.
Note
If you use MS Outlook 2000, make sure that you add Kerio Connect and Outlook Address Book items during configuration. In higher versions of MS Outlook, Outlook Address Book is added automatically.

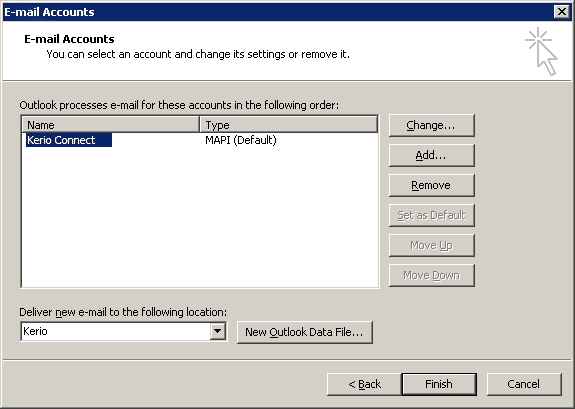
In order for Kerio Outlook Connector to work properly, it is necessary to set the Kerio file as the default data file. If the file has not been selected automatically before, it can be specified in the menu. The Email Accounts window contains the Deliver new email to the following location option, where Kerio can be selected.
Kerio Outlook Connector can also check whether the Kerio is selected as a default message store. By default, the check is enabled and if the Kerio is not selected as a default store when MS Outlook is started, a warning is displayed.
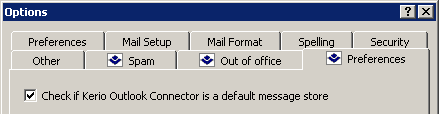
This option can be enabled/disabled in the menu (see figure 6.9 The store checking option).