Kerio WebMail includes a folder tree which is the basic tool for maintenance of folders (see figure 1.73 Context menu of the root folder). The easiest way to work with individual folders is to use the context pop-up menu where folders can be created, removed, user access rights can be set, etc.
Folders displayed in Kerio WebMail can be categorized either by their user access rights or by type.
Classification by types:
Email — the folder where email messages can be kept and maintained.
Contacts — in such folders, contacts can be kept and maintained.
Calendar — in such folders, events can be kept and maintained.
Tasks — in such folders, tasks can be kept and maintained.
Notes — a folder where notes can be kept.
Root folder — the basic folder. For detailed information on this folder, see section 1.12.1 Root folder.
Classification by user access rights:
The default personal folders — all folders created within the first logon. Unlike the other folders, these ones cannot be removed. The default personal folders include for example Inbox, Junk E-Mail, Drafts, Contacts, Notes, etc.
Personal folders — personal folders also include default folders. They include any folders and subfolders which cannot be accessed by other users.
Public folders — special folders which are, by default, available to all users of the particular domain or of any Kerio Connect domain (this depends on server settings). Public folders can be handled only by users with special privileges. These privileges can be assigned by the administrator in the Kerio Connect administration interface. For details on public folders, refer to section 1.12.5 Shared and public folders.
Shared folders — any folders which can be accessed by other Kerio Connect users with appropriate rights (for details, see section 1.12.5 Shared and public folders).
Subscribed folders — folders owned by another user which are shared and can be viewed, edited or administered by the current user (depending on special rights assigned by the owner). For details on subscription of folders, refer to section 1.12.6 Folder subscription.
The root folder is the primary folder on the top level in the folder tree. Its default name usually consists of the username and the domain (see figure 1.73 Context menu of the root folder). Root folder is accessed through the pop-up context menu opened by right-clicking (see figure 1.73 Context menu of the root folder):
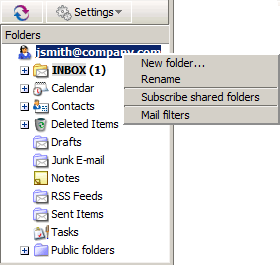
- New folder
Use this option to create a new folder.
- Rename
The root folder can be renamed.
- Subscribe shared folders
This option allows connecting to the folders shared by other users (for detailed information about subscribing, refer to chapter 1.12.5 Shared and public folders).
- Mail filters
In Kerio WebMail, it is possible to create filtering rules for the incoming messages. For detailed information about filtering rules, refer to chapter 1.14 Message filtering.
Any new folder is created as a subfolder of an existing folder. To create a folder on the top level, create it as a sub-folder of the root folder. The root folder is the primary folder on the highest level (the name of the root folder is the same as the user's email address). The root folder also can be renamed.
The following steps must be taken to create a new folder:
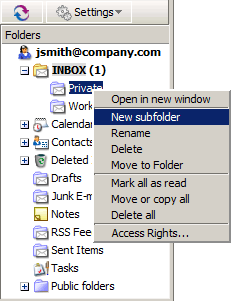
First, select the superior folder and right-click on it.
It is recommended to use the same folder types for all subfolders. In other words, email folders should be created as subfolders of other email folders (and not under a calendar folder), for example. These rules keep the folder tree well-organized and comfortable.
In the folder's pop-up menu just opened, click on New subfolder (see figure 1.74 Folder's pop-up menu).
In the dialog just opened, specify name of the folder and select its type:
Email (for storage of email messages)
Contacts (where user personal information is kept)
Calendar (management of events and meetings)
Notes (storage and management of sticky notes)
Tasks (management and storage of tasks)
Once the dialog is confirmed, the new folder is added to and displayed in the folder tree.
In section 1.12.2 Creating folders, instructions for creation pf a new folder have been provided. This section lists and describes actions which can be applied to folders:
Folders can be renamed through their pop-up menu, as follows:
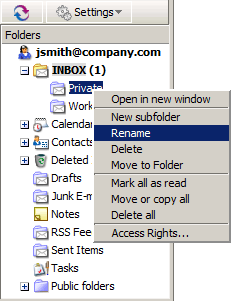
Select a folder to be renamed and right-click on it.
This opens the folder's pop-up menu (see figure 1.75 Folder's pop-up menu — Rename).
Click on Rename.
A dialog is opened where the item can be renamed. Enter a new name and confirm changes by the button.
Note
For technical reasons, it is not possible to rename default personal folders. Therefore, the Rename option is not available in their pop-up menu.
Folders can also be removed, as follows:
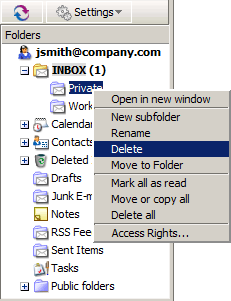
Select a folder to be removed and right-click on it.
This opens the folder's pop-up menu (see figure 1.76 Folder's pop-up menu — Remove).
Click on Remove. Kerio WebMail asks if you really want to remove the folder. Once confirmed, the folder is either moved to Deleted Items or it is removed immediately. This depends on settings of the Delete messages permanently option in Kerio WebMail (for details on user settings, see chapter 1.13.1 User Settings).
Note
For technical reasons, it is not possible to remove default personal folders. Therefore, the Removed option is missing in their pop-up menu.
Folders can be moved within the folder tree either through the pop-up menu or by using the Drag & Drop method:
Drag & Drop
Select a folder to be moved.
Click on the folder.
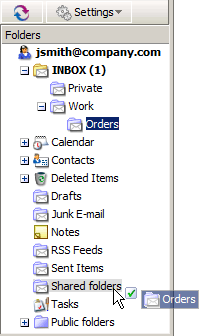
Hold the mouse button and drag it over the folder to which the selected item will be moved. When a green icon appears at the pointer, let hold of the mouse button to move the folder (see figure 1.77 Moving folders by the Drag & Drop method).
Note
Unless the folder is dragged over a folder where it can be moved, a red icon is displayed meaning it is impossible to move the message to the particular location.
Pop-up menu
Select a folder to be moved.
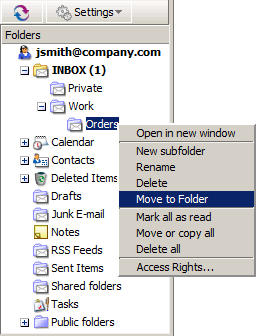
This opens the folder's pop-up menu (see figure 1.76 Folder's pop-up menu — Remove).
Click on Move.
In the dialog just opened, select a folder to which the item will be moved.
Click to confirm the action.
Note
For technical reasons, it is not possible to move default personal folders.
Folder pop-up menu includes several tools for group manipulation with all items included in the particular folder:
The Mark all as read option is available only in pop-up menus of email folders.
It can be helpful in the following cases:
the function of marking shown read messages as read is disabled (messages are not marked as read once shown in the message-reading pane),
a separate window is used for message reading (messages are not marked as read once shown there).
To mark all unread messages as read, follow these instructions:
Click on the folder with the right mouse button.
This opens the folder's pop-up context menu.
Click on Mark all as read.
This option can be used to copy or move all messages included in a particular folder. This option is available for all folder types.
To copy or move all items from one folder to another, follow these instructions:
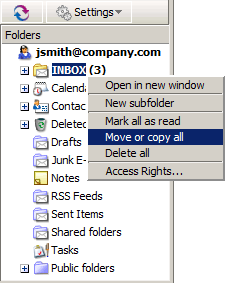
Right-click on the folder to open its pop-up menu.
In the pop-up menu, click on Move or copy all (see figure 1.79 Pop-up menu — Move or copy all).
In the move-or-copy dialog just opened, select the destination folder, i.e. the folder to which the items will be moved.
Warning
Items can be moved or copied only between folders of the same type. This implies that it is not possible to copy or move for example email messages to a calendar folder, tasks to a note folder, etc.
Once the destination folder is selected, click on Move or Copy, depending on the action you want to take.
The Delete all option removes all items included in the particular folder. This covers regular items, such as messages, contacts, tasks, events and notes, as well as all subfolders. This option is available for all folder types.
To delete all items in a folder, follow these instructions:
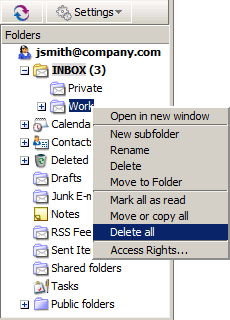
Right-click on the folder to open its pop-up menu.
In the pop-up menu, click on Delete all (see figure 1.80 Pop-up menu — Delete all).
Kerio WebMail asks if you really want to remove the folder content. Once confirmed, the folder content is either moved to Deleted Items or it is removed immediately. This depends on settings of the Delete messages permanently option in Kerio WebMail (for details on user settings, see chapter 1.13.1 User Settings).
Kerio Connect enables creation of shared and public folders. A shared folder is any folder of any user who has decided to share it with other users (or group of users, domain, etc.) and grant specific rights to them.
Public folder is a special type of shared folder. This folder is automatically available for reading to all users of the domain or of Kerio Connect.[5]
All public folders you have been granted reader, editor, or administrator rights to, will automatically appear as subfolders of Public folders.
Each user can grant other users rights to any of his/her folders (we recommend careful consideration of this action — for example granting another user rights to the user's INBOX folder could have adverse implications).
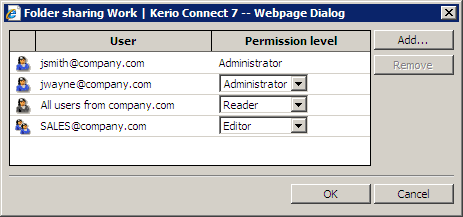
Define access rights in the Folder Sharing dialog box which is opened upon right-clicking on a selected folder.
Click on . In the Add Sharing dialog just opened, specify type of sharing.
Folders can be shared with various subjects.
User — a particular user. Enter username (in case that the user belongs to the same domain as the sharer) or username with domain in the
username@domainpattern (e.g.jgraham@company.com) if the user does not belong to the same domain.Group — a particular group. Use the entry to specify groupname with the domain included in format
group@domain(e.g.sales@company.com). Domain must be included in name specification whenever rights are to be assigned to the group from another domain.All users from domain — specify the Domain entry with the particular domain name.
All users — special type of access rights. The folder can be subscribed (for more information on account mapping, see chapter 1.12.5 Shared and public folders) by all users with accounts in Kerio Connect.
Anonymous access — special type of access rights. The folder can be subscribed by all users including those who have no account in Kerio Connect. This type of access rights is useful especially for publishing of calendars in the iCalendar format.
Folders with anonymous access can be also accessed by special scripts.
To set user rights, select one of the options from the Permission level pull-down menu:
Administrator — the user can read the folder as well as share it with other users and remove items in the group or the group itself. This user is not allowed only to remove access rights for the user who created the group.
Editor — the user can edit items in the folder (add and remove items, etc.).
Reader — the user is allowed only to read the folder's items. No editing is allowed.
Note
Username is required when access rights to a particular user or group are being set. The selection of a user or a group from the list is not available for security reasons. It is not recommended to allow a common user to access the list of all users.
Sharing can be disabled by marking a particular line in the list and clicking .
Once the folder is shared, save changes by clicking on .
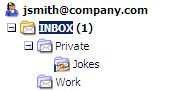
If sharing is correctly set, the shared folder will be marked as shared (see the Jokes folder in the image 1.82 Shared folder), so that the user knows which of his/her folders has been shared to other users.
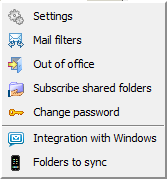
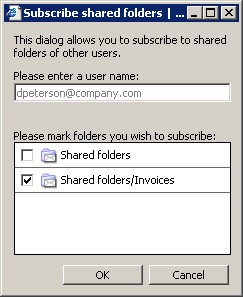
Shared folders can be subscribed in (see figure 1.83 Settings Menu). Click to open the dialog to enter the username of the person whose folder you want to subscribe to. This person must have an account in Kerio Connect, otherwise the subscription will not work.
If the username has been entered properly and the user has decided to share a folder with you, a dialog box with a list of shared folders will be opened. Check the folder to subscribe to a specific folder; clear the checkbox to unsubscribe.
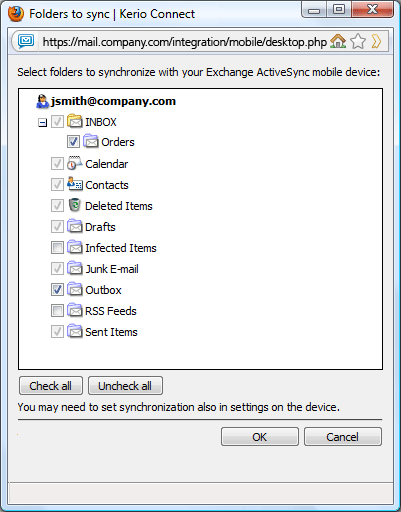
Folder synchronization with mobile devices which support the Exchange ActiveSync protocol can be set in the menu.
In the opened dialog, select the folders you want to synchronize (see figure 1.85 Folder synchronization with mobile devices dialog) and confirm by clicking on .
Warning
For information about which folders can be synchronized with your device, refer to the product's user guide or the producer's documentation for that particular device.
Some mobile devices require synchronization settings in their own configuration.
More information on data synchronization with mobile devices can be found in section 4 Data synchronization with mobile devices.