In addition to working with messages in folders, the Kerio WebMail interface also enables various settings. These changes can be performed in the Settings menu available via the Kerio WebMail's toolbar (see figure 1.86 User settings menu).
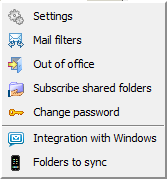
Kerio WebMail customization is enabled via the first item in the Settings menu. This opens a dialog divided to several tabs:
The General tab contains basic user settings for the Kerio WebMail interface:
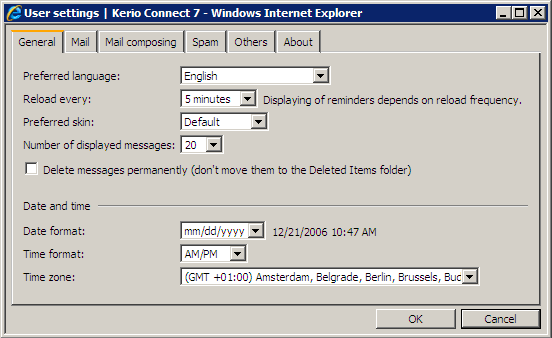
- Preferred language
Selection of a language for the Kerio WebMail interface. The Browser detected option sets a language in correspondence with settings of the particular client (i.e. of the web browser or the system where the browser is running).
Note
All items, such as messages, contacts, events and tasks, in all folder types will also be sorted by the alphabet of the language set as preferred. In result, if for example English is set as preferred and subjects are in German, subjects will be ordered by English alphabet and some specific national characters may also cause problems in sorting.
- Reload every
This option controls the folder tree restore and reminder display.
- Preferred skin
Skin of the interface can be set in the menu. Save the settings to switch to activate the new skin.
- Number of displayed messages
Use this option to set the number of messages that will be displayed in the message list.
This option applies also to number of events, contacts, tasks and notes which will be displayed at one page.
- Delete messages permanently
Enable this option if you want that items deleted by the
Deletekey are removed right away instead of moved to Deleted Items.The settings apply to all folders save Deleted Items and Junk E-mail. Items in these two folders are always removed for good.
- Date format
Selection of the date display. The date form follows this pattern: dd — day, mm — month, yyyy — year.
- Time format
Set time format which will be applied to time display in all folders.
- Time zone
Time zone settings are based on Kerio Connect by default. Users can re-define the time zone, if they plan to use Kerio WebMail in a time zone different from the server location.
These settings are especially useful in communication with people located in a different time zone. The communication will not be complicated by an incorrectly specified time of meeting or message.
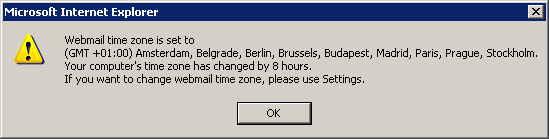
If Kerio WebMail is opened in a browser with a different time zone, a dialog box appears with an information that the browser time zone has changed and a question whether you want to change the Kerio WebMail time zone. This is necessary for correct conversion of time zones in Kerio WebMail.
Time zones are described in more detail in chapter 1.15 Time zones.
Use the Mail tab to set parameters for mail folders. Mail folders are described in detail in chapter 1.6 Email.
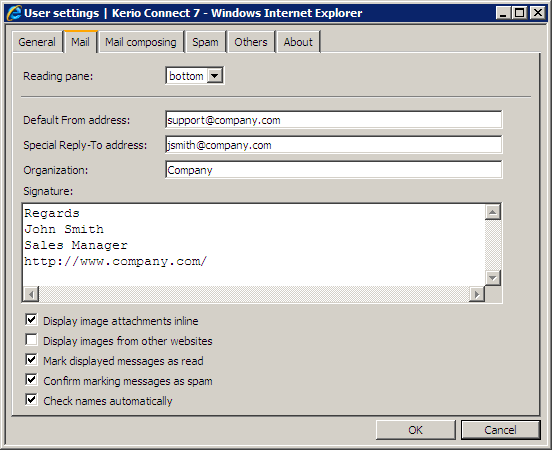
- Reading pane
This type of window is available in mail folders only. It is an area where the body (text) of the message is displayed. The subwindow can be positioned either on the right or at the bottom of the active window or it can be hidden.
- Default sender address
The email address from which the messages are sent.
- Address for replies
Address to which replies will be sent (the
Reply-To:item).- Organization
Name of the company is included in the message as the
Organization:header.- Signature
The signature added automatically to all messages sent from the Kerio WebMail interface (including replies and forwarded messages).
- Display image attachments inline
The image attachments (GIF, JPEG) can be displayed directly in the message body. If this option is unchecked, only a hyperlink to the image is displayed. If you are connected to the Kerio WebMail interface via a slow line (e.g. modem), we recommend not to enable this option.
- Display images from the web
Each message with HTML body can contain links to images stored on the remote server. If this option is enabled, the images will be downloaded from the server. This way, active mailboxes can be identified easily (and misused for the purpose of sending spam messages). Your computer can be also attacked due to browser security errors. For security reasons, it is recommended to leave this option inactive.
- Mark displayed messages as read
For better reference, new messages which have not been read yet are bold. If the Mark displayed messages as read option is enabled, new messages are marked as read when opened. Read messages in the message list are not displayed bold any more. This option is enabled by default. If you do not want the messages to be marked as read upon opening, clear this option.
Note
Use the pop-up menu of a selected message to mark it as read/unread.
- Confirm marking messages as spam
Use this option to enable/disable the confirmation dialog box.
- Automatic checks of address
When recognized, the address of the recipient is filled out automatically upon entering, after the pointer is moved into other field. If there are more addresses that start with the string specified, the window with all appropriate addresses is opened.
The search is performed in all folders set on the Mail composing tab. By default, the default private and public Contact folders are scanned.
Use this tab to set some of the parameters for message sending.
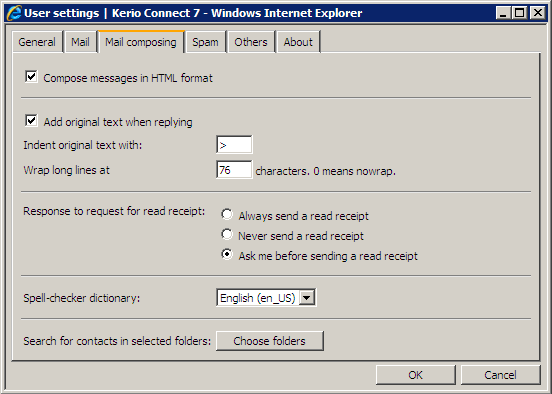
- Compose messages in HTML format
This option is checked by default. The message text cannot be formatted, if the message is not composed in HTMLformat (see chapter 1.6.3 Message writing). This setting applies to all messages.
Messages can be also composed in HTML format (or in the plain text format) by default and you can use the other alternative only when needed. To specify this setting for a selected message, use the Options dialog in the message editor (see chapter 1.6.3 Message writing). This applies only to the selected message; the default settings are not changed.
Warning
In Safari, it is not possible to compose HTML messages. Therefore, the Compose messages in HTML format option is missing for this browser.
- Add original text when replying
Use this option, if you want to include the original message in your reply. You can also select the character that will appear before each line of the original message. These characters are used to differentiate graphically the original message from the reply.
The line wrap function facilitates the reading of messages. The value of
76characters is set as default. If the value is set to0, the text will not be wrapped.- Response to request for read receipt
Use this option to specify what will happen to a delivered message that requires reading confirmation. It is recommend to select the Ask me before sending a read receipt option, because users can decide according to the importance of the message whether the confirmation should be sent or not.
- Spell checker dictionary
Selection of the spellcheck dictionary language. When you use the dictionary for the first time, the spellcheck may take longer, since the dictionary is loaded into the memory.
- Search for contacts in selected folders
Check this option to speed up searching for contacts. The search engine goes through selected folders only.

The Spam tab contains several options to get rid of unsolicited email:
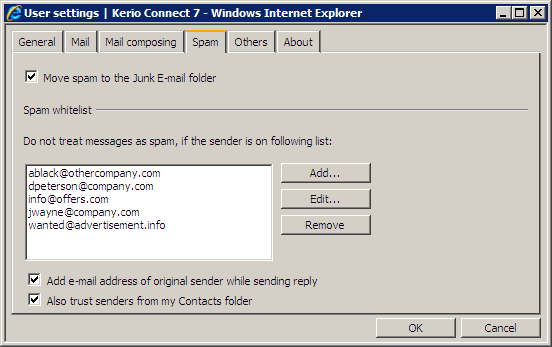
- Move spam to the Junk E-mail folder
Check this option to move all recognized unsolicited email directly to the Junk Email folder.
This option also enables adding email addresses to the list of trustworthy users (see below).
- Do not treat messages as spam... (Spam whitelist)
The spam filter may mark even solicited message as spam, if it bears some spam characteristics. So called Spam whitelist enables to define senders who will not be considered as spammers by any means. Their messages will not be marked as spam.
- Add e-mail address of original sender...
Upon each reply, the email address of the particular sender now becoming an addressee is added to the “Spam whitelist” automatically.
This option determines that any email message replied is considered as non-spam. Any other messages sent from such addresses are automatically considered as non-spam.
- Also trust senders from...
If this option is enabled, messages marked as spam which were sent from addresses included in the default contact folder are not moved to the Spam folder.
This option supposes that email addresses in one's contact list are trustworthy. This option simplifies whitelist definition.
For details about spam, see chapter 1.6.5 Spam filter.
The Others tab enables users to customize this page. For details about the “Today” page, see chapter 1.4 The Kerio WebMail environment.
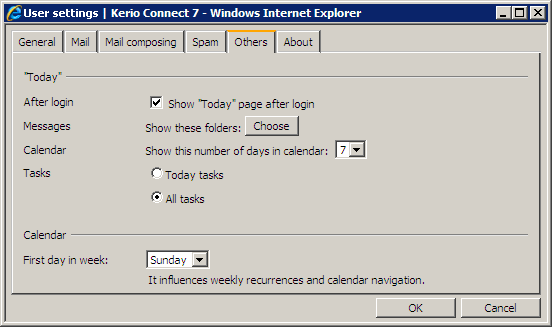
Today
- After login
This option makes the “Today” window open after user login to the Kerio WebMail interface.
- Messages
You can click on to select email folders which will be showed in the Today page.
- Calendar
Use this option to specify the number of days displayed on one page of the calendar folders.
- Tasks
On the “Today” page in the Tasks section, users can specify whether only the tasks that are due today (Today tasks) or all uncompleted tasks (All tasks) will be displayed.
Calendar
- First day in week
This setting takes effect in Kerio WebMail in two cases:
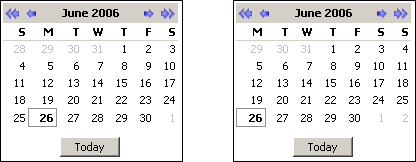
Thumbnail calendar in calendar folders — if Sunday is set as the first day of the week, weeks in thumbnail calendars start with Sundays. Consequently, if Monday is set as the first day of the week, weeks in thumbnail calendars start with Mondays (see figure 1.94 Comparison of thumbnail calendars).
Weekly recurrence period applied to events and tasks — setting of the first day in the week takes effect only in a specific case which will be better understood through an example:
Every two weeks, on Sundays and Wednesdays, in the evening, Mr Jonathan Flykiller meets friends to play chess. He uses recurrent events in his calendar to remind him of these meetings. The events are set as follows:
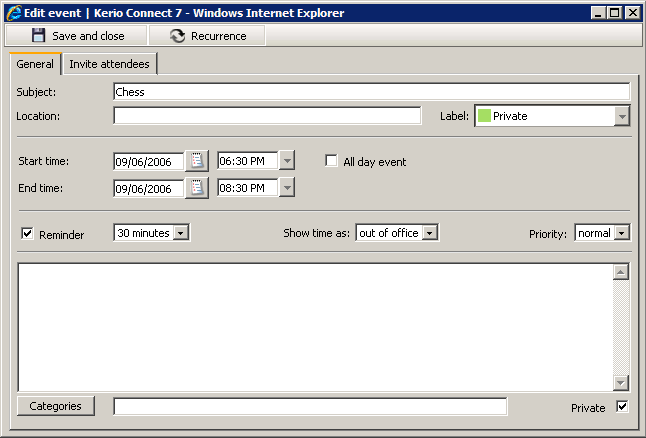
Mr Flykiller opens a new event in the calendar and sets date and time (
September 9from6.30 PMto8.30 PM) and sets the subject name forChess(see figure 1.95 Event settings).Weekly recurrence is set to once-a-two-weeks recurrence on Wednesdays and Sundays (see figure 1.96 Setting recurrence).
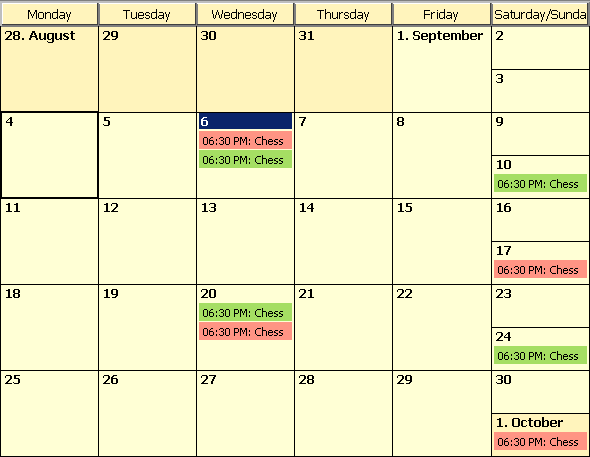
Now, let's see how this recurrent event is shown in a calendar where Sunday is set as the first day of the week and compare it to the case where Monday is set as the week-starting day. The difference can be understood through figure 1.97 Comparison of calendars with different week-starting days (the green event was created when Monday was set as the week-starting day while the red events were created when Sunday was set as the first day of the week).
If Monday is set as the week-starting day, Wednesday and Sunday are included in the same week.
If Sunday is set as the week-starting day, only Wednesday is marked in the first week since Sunday, September 10, already belongs to the following week. The following weeks start with Sunday (starting on September 17 at figure 1.97 Comparison of calendars with different week-starting days) as set in the parameters.
Note
If settings of the starting day of the week are changed, settings of existing events does not change.

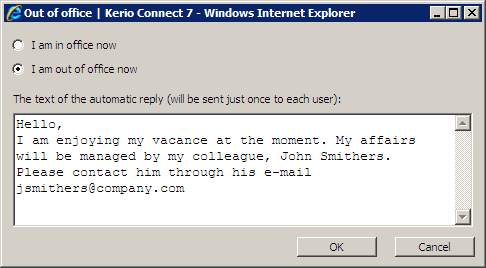
The Out of office rule allows setting of automated responses to incoming messages.
This automatic reply can be enabled when a user cannot reply messages him/herself (e.g. when the user is ill or on vacation). It is usually helpful when the user is supposed to reply immediately.
Automated reply can be set in the toolbar menu. In the Out of office dialog, switch to the I am out of office now mode and enter a message which will be sent to incoming messages. Thus, senders know immediately that the user cannot send them any answering message at the moment.
Automatic replies are defined by a rule applied to incoming email (the rule is saved in Kerio Connect). These rules as well as their definition are focused in chapter 1.14 Message filtering.
The I'm out of office rule consists of the following items:
Condition: The rule will apply to all incoming messages except email sent from mailing lists. The automatic answer is not sent where answering to another automatic email (this should prevent users from email loops).
Action: The text entered will be sent to each sender's address included in an incoming message only once a seven days.
Warning
Before enabling the Out of office rule, it is recommended to enable also the Spam rule to make sure that automatic replies are not sent to spammers. If the Spam rule is not enabled, your address will be exposed to spammers who try to send their spam messages to randomly generated addresses and later use those addresses from which they get an answer (so that they are sure the address exists and start to send even larger volumes of spam messages to it).
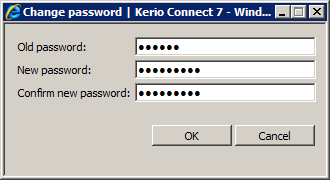
Password can be changed directly in the Kerio WebMail interface, without the need to contact the network administrator.
Use the Change password option in the menu of the toolbar.
For security reasons, it is necessary to use the secured HTTP for connecting to Kerio WebMail. The beginning of the URL address must be entered as follows:
https://
Warning
If you use the unsecured version of HTTP protocol, the password cannot be changed in the application.
The dialog contains only three fields to specify the old and the new password. The new password must be entered twice, in order to eliminate typing errors. If the password contains special (national) characters, users of some mail clients will not be able to log in to Kerio Connect. It is therefore recommend to use only non-diacritic characters for passwords.
Warning
If a user connects to an account which is mapped from the Apple Open Directory and they authenticate against the password server, the password cannot be changed.
Integration with Windows/Mac OS X/Linux is a handy tool that helps use Kerio Connect and its features even more effectively and in a more comfortable way. It is actually a web page where you can find for example download links for client extensions and URLs of your calendars which can be used for connection via the iCal and CalDAV protocols.
Content of this page differs depending on the operating system on which it is viewed. According to this fact it offers relevant options (the Kerio Outlook Connector on Windows, Kerio Sync Connector for Mac on Mac OS X). The content also respects whether you are connected via HTTP or HTTPS. It also recognizes whether you are connecting via a mobile device. In such cases it offers also download of the Kerio Connect's SSL certificate (for details on the SSL certificate, see section 4.2 SSL Certificates).
Shortcuts for editing of contacts, events, distribution lists and notes:
Ctrl+S — saves the data and closes the window.
Ctrl+Enter — saves the data and closes the window.
Ctrl+N (Command-N) — opens window New message, New contact, New event, New task or New note, depending on the type of the folder just being opened.
Writing a message:
Ctrl+K — this key shortcut completes hinted email addresses in To, Cc or Bcc entries. Addresses to be entered are looked up among the addresses saved in contact folders.
Ctrl+Enter — closes the message and sends it.
Ctrl+S — saves the message to the Drafts folder.
Ctrl+C — the text is copied to the clipboard.
Ctrl+V — the text is pasted into a document or a dialog box.
Ctrl+X — the text is cut and pasted to the clipboard.
Ctrl+B — makes the text bold.
Ctrl+I — makes the text italic.
Ctrl+U — underlines the text.
List of messages:
Ctrl+R (Command-R) — replies to the message.
Ctrl+N (Command-N) — opens the New mail window.
Ctrl+M (Command-M) — marks message as read.
Ctrl+U (Command-U) — shows the source of the message.
Ctrl+F(Command-F) — opens a new window where the message can be forwarded.
In Kerio WebMail, the following keys can also be used:
Home— used in list browsing. The first page of the current list is opened upon clicking on this key.End— used in list browsing. The last page of the current list is opened upon clicking on this key.Page Up— used in list browsing. The previous page is opened upon clicking on this key.Page Down— used in list browsing. The next page is opened upon clicking on this key.Enter— opens selected item.