Note folders in Kerio WebMail can be used to record simple notes. In non-digital world, these notes are represented by loads of colourful stickers used as reminders. One of the great advantages of electronic notes is their central storage and the impossibility of losing them.
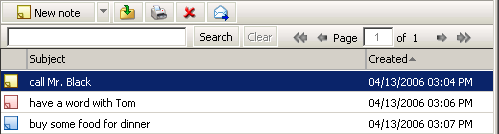
Individual notes are organized in a table where users can mark them as completed. Each row contains one note, as well as available information about it (see figure 1.71 Notes).
Note folders are equivalent to other folders. They can be shared, set as public or attached. For more information on shared and public folders, see chapter 1.12 Folder Administration.
In Kerio WebMail, notes are shown in a list including note names, date of creation and specific colours. Colours can be important. Each colour stands for a value. Colours can represent for example topics and areas or levels of importance.
By default, up to 20 notes are listed on one page. To change number of notes displayed on a single page, use the Settings section in Kerio WebMail (see chapter 1.13.1 User Settings).
The detailed information on individual notes is displayed in the columns. Each column enables sorting notes by information. Click the column heading to sort notes in the ascending or descending order (see the arrow next to the column name) by alphabet, time or colour (depending on the column contents).
Note
For listing by subject, items are sorted by the alphabet of the language set in Settings as preferred (the General tab) — for details, see chapter 1.13.1 User Settings. In result, if for example English is set as preferred and subjects are in German, subjects will be ordered by English alphabet and some specific national characters may also cause problems in sorting.
Users can customize the appearance of the table and the information shown. The columns can be added or deleted. Right-click the table header and specify the column settings in the Select fields window. The pop-up menu contains the Change columns option. Checked columns will be shown in the dialog box, unchecked columns will be hidden.
To create a new note, click on the New note option on the toolbar. A simple yellow window is opened. Any text can be written in the note area. The text of the first line is automatically used as the note's subject. To separate this line from others, use Enter. The other lines are not displayed in the list.
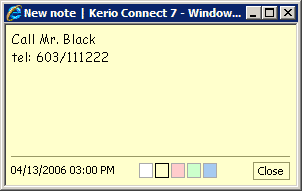
The note dialog also includes date and time of the creation and a colour pallet which can be used to select a colour for the current note (yellow is used by default).
The note window can be resized. The parameters set will be kept for future. This means that the window's size and position will be kept for the next time the note is opened.
When finished, save the note by the button (see figure 1.72 Note).
Kerio WebMail allows forwarding of notes in such a format so that it is possible to save them to notes folders. Thanks to this feature we can avoid copying of the note data to an email message and to a new note edit dialog box on the addressee's side.
Kerio WebMail also supports another option. When a message with an note in the attachment is received, the recipient can simply click on the attachment to open the note in the standard note edit dialog box. Click on to confirm settings and save the note to the default personal Notes folder.
Note
To save a contact or open it as an attachment, right-click on it and use one of the options available, Open or Save.
The attachment with the note is sent in a special proprietary format which can be used only in Kerio WebMail or MS Outlook extended by the Kerio Outlook Connector. In other types of email clients the note is displayed only in HTML.
To forward a note, select it by the mouse pointer and click on the icon on the note folder's toolbar (it is also possible to use the corresponding option in the pop-up context menu).
Select a note and click on a corresponding icon to open a message editor where the note is included as an attachment. At this point, simply send the email message.