This chapter will provide you with an overview of options and features of mail folders, i.e. folders where email messages are kept. Number of email folders in a mailbox is not limited.
The most essential folder is Inbox. By default, new messages are delivered to this folder. It is also possible to make the server deliver messages sorted by certain criteria to other folders, however, this issue will be addressed in chapter 1.14 Message filtering.
Another basic email folder is Sent Items. Here, copies of all messages sent from the mailbox are stored.
Another email folder to be mentioned is Drafts. This folder stores any messages which have been started or even completed but not sent.
The three basic folders described above cannot be removed as they belong to so-called default folders. Details on default folders as well as on other folder types are focused in section 1.12 Folder Administration.
In this section, you will be provided with information on basic structure of email folders. The mail folders are arranged in a table (list). Each row contains one message and available information. Information to selected messages are listed in the columns. Each line may include icons referring to other features of the particular message (the description provided below addresses them in the order from left as they may appear in the line):

Priority — this icon represents the importance of the message. High priority is marked by a red exclamation mark, whereas a blue downward arrow stands for a low priority message. Priority is set by the message sender (see section 1.6.3 Message writing).
Attachment — the paperclip icon indicates that the message contains an attachment (i.e. an attached file).
Flag — flags are represented by a little red flag icon used to highlight messages (so it is later easier to find them).
Icon — these icons indicate different types of messages (forwarded message, spam, invitation, etc.).
From — the address of the sender.
To — the address(es) of the recipient(s).
Cc — the address(es) of the copy recipients.
Received — the date/time when the message was received. On the day of receipt, this column shows only the time data; from the next day on, the date is displayed as well.
Date — the day when the message was sent. If the message is received on the same day, only time data are shown. From the next day on, the date is displayed as well.
Size — the size of the message in kilobytes.
| icon | Description |
|---|---|
| high priority messages | |

| low priority messages |
| attachment | |
| message flag | |
| unread message | |
| read message | |

| unread spam |

| read spam |
| messages already replied | |
| forwarded messages | |
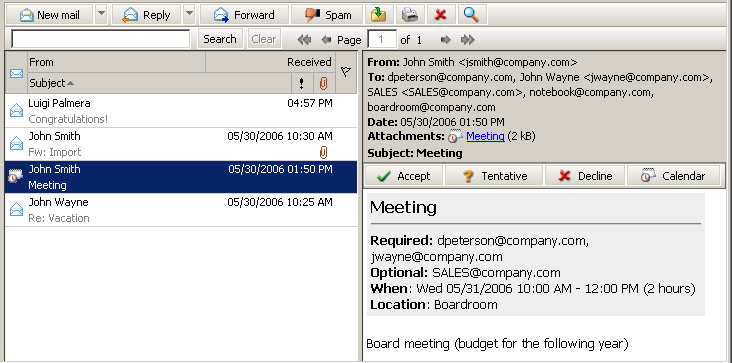
| event (meeting invitation or a reply to an invitation) | |
| task (notice informing of the user's participation on a task or a reply to such a notice) |
Table 1.1. Overview of icons used in message lists
By default, up to 20 messages are listed on one page. To change number of messages displayed on a single page, use the Settings section in Kerio WebMail (see chapter 1.13.1 User Settings).
New messages are delivered to the Inbox folder by default (folders for incoming messages can be specified in the rules — for details, see chapter 1.14 Message filtering). The unread messages are marked in bold. The number of unread messages is indicated in parentheses next to the folder name. Double-click selected message to open it in a new window (or select a message in the list and press Enter).
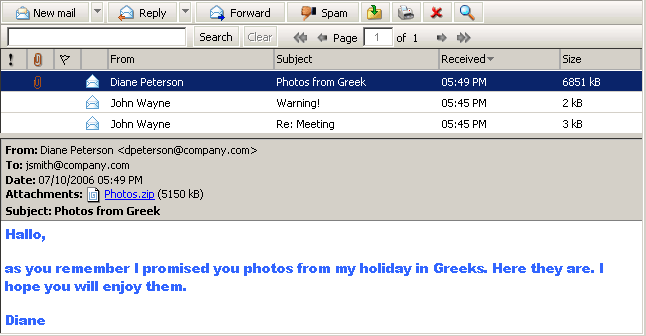
The reading pane is an area where the message body is displayed (message body, images, etc.). There are two options of location of the reading pane (at the bottom or on the right — see figures 1.19 Message reading and 1.20 The reading pane is located on the right from the list of messages) or it can be hidden. If the window is hidden, message contents are displayed in separate windows. The reading pane can be enabled or disabled in Settings. For detailed information on user settings, see chapter 1.13.1 User Settings.
The appearance of the message table can be changed depending on the information shown. Kerio WebMail enables users to display or hide any of the columns. Columns can be set as follows:
Right-click on the column captions.
The pop-up menu that appears contains the Change columns option.
Click on Change columns to open the Select fields dialog box and select columns to be shown in the list of messages.
Users can select (check) the columns they want to include in the table. Checked columns will be displayed in the table, unchecked columns will be hidden.
Sorting messages by columns
The detailed information on individual messages is displayed in the columns. Each column enables sorting messages by information. Click the column heading to sort tasks in the ascending or descending order (see the arrow next to the column name) by alphabet, numbers or time (depending on the column contents).
Note
For sorting by subject or by sender, items are sorted by the alphabet of the language set in Settings as preferred (the General tab) in Kerio WebMail — see chapter 1.13.1 User Settings. In result, if for example English is set as preferred and subjects are in German, subjects will be ordered by English alphabet and some specific national characters may also cause problems in sorting.
Adjusting the column width
The width of the message table can be adjusted the same way as in the spreadsheet programs. To change the column width, click between two columns in the table header and drag the cursor right or left as needed (see image 1.21 Adjusting the column width).
Note
Settings of column width is not remembered. Next time opened, the columns return to their default state.

Each incoming message may include one or more attachments. The attachments are files of various types (text, images, audio, video, archived compressed folders, etc.), that can be attached to a message and sent to the recipient.
If you receive an attachment in a message, you can open it, view it and also save it to a folder (by using the pop-up menu opened by right-clicking on the attachment). This opens a standard dialog where the attachment can be saved. Users can also use the pop-up menu of the link (the Save as option).
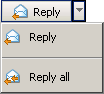
It is possible to reply directly to any message. This can be done by the button available on the toolbar (see figure 1.22 The Reply button menu). The button includes a menu where it is possible to select from two options ( to send the reply only to the sender or Reply All to send the reply to all addresses included in the original message). Click on one of these buttons to compose the reply message. The email address of the person who has sent the original message is entered automatically in the To field. Note also that the subject of the message now contains the Re string. This string indicates reply to previous message.
The message can be also forwarded to other recipients. Click on to edit the selected message where the To and Cc fields are left blank, because the system does not know who do you intend to forward the message to.
If you receive a message with the Fw: string prefixing the subject, you'll know that it is a forwarded message (. Fw: detailed information regarding the today's meeting).
Each of the received messages can be marked by a flag in Kerio WebMail. It is a little colored flag symbol that reminds users of the message it was appended to. Flags help us look up messages easily.
Click the column with the flag image to add a flag to/from a message (see image 1.23 Message list). The same method can be followed to remove a flag. Simply click on the flag you wish to remove.

Note
Image flags can be added to messages even in MS Outlook. The flags appended to messages in this application will be displayed also in Kerio WebMail and vice versa. The problem is, that MS Outlook enables users to add flags of different colors. Kerio WebMail shows all flags in one color.
In Kerio WebMail, new messages can be composed in the special window designed for message editing. To open this window, use the button on the toolbar.
The window for creating new messages is divided into several sections. The first one allows editing of addressees and message subject (name). This part is called message header. The second section allows insertion of the message. This part is called body. Another section is the toolbar in the upper part of the window. Several functions are included that can be used to manipulate with the current message.
The message header (see figure 1.24 E-mail header) provides the following options:
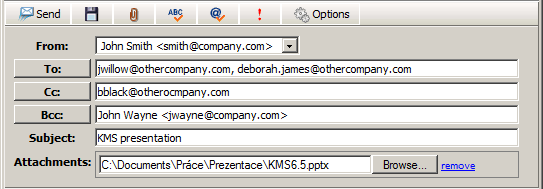
- From
This item is displayed only if you use an address different from the default email address (setting of default user address is described in section 1.13.1 User Settings).
The selected address will be treated as sender address.
- To
Enter the email address of the recipient in this field. More than one email address is allowed; the addresses must be separated by commas (see picture 1.24 E-mail header).
- Cc
The same function as the To field. However, this item is used in special cases where the message includes multiple addressee, some of them only being informed of the issue by the message. The addressees included in this section are not expected to reply to the message.
- Bcc
The address entered in this field is hidden for the other recipients. Blind copy is useful especially when a message is to be sent to more email addresses and you want to protect the privacy of one or more users.
- Subject
The subject stands for the message's name. It should provide clear hint on the message content (helpful for later reference).
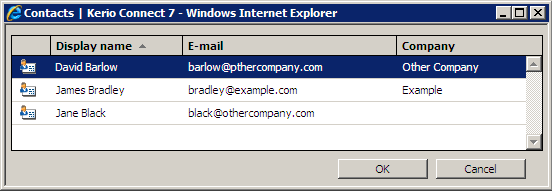
Next to the fields for recipients' addresses, the , and buttons are available (see figure 1.24 E-mail header). These buttons open the search dialog (see figure 1.25 Searching in contacts) where first and last names can be used to easily filter out particular email address to which the message would be sent. The look-up dialog scans only through the addresses included in the account's contact folders.
Below, you can find detailed description of the look-up feature:
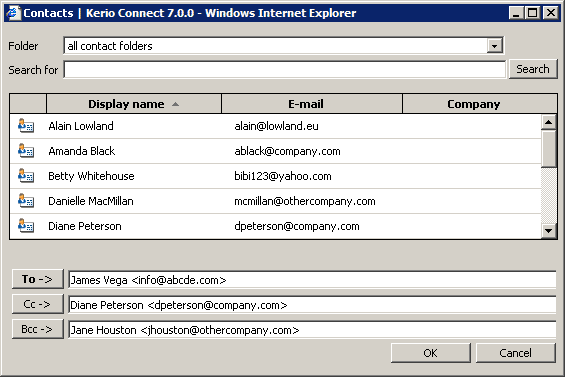
- Folder
The addresses of recipients can be selected from the personal address book or from other contact folders that the user has connected to. In menu, select folders where the search will be performed.
- Search for:
Enter at least the first letters of the searched contact (first name, last name or a part of email address) which will be used as a searching criteria string.
Note
The look-up is not case-sensitive.
Click the button to start searching using the parameters previously defined.
The toolbar includes several buttons allowing basic operations such as message sending or saving:
- Send
The message will be sent to the addresses entered into the To, Cc and Bcc fields.
- Save as Draft
The message will be saved to the Drafts folder, where it can be opened, edited and sent.
- Attach
Use this button to attach a file to a message. More than one file can be attached to the message. Press the Attach more button multiple times and select the files you want to attach to the message.
If an undesirable file has been attached to the message by mistake, remove it by clicking on the Remove link next to the attachment.
Warning
Each attachment appended must not exceed the limit set by the administrator in Kerio Connect. Otherwise, the particular message will not be delivered.
- Spelling
Use the Spelling button to perform a spellcheck of the written text (for more information on spellchecker, see section 1.6.4 Spellchecker).
- Check
The button completes addresses by using connected contact folders. By default, the default personal contact folder is set for checking for names. In addition, other contact folders can be added in Settings (for details, see section 1.6.6 Automatic check for email addresses). As well as the button, the
Ctrl+Kshortcut can be used for the same purpose (see section 1.6.6 Automatic check for email addresses).- Priority
Press the exclamation mark icon to send the message with high priority.
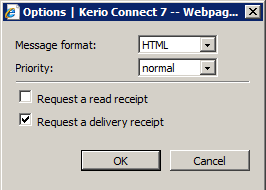
- Options
The button opens a dialog box where some of the message parameters can be set, e.g. its priority or delivery confirmation request.
Message format — messages can be sent either as plain text or in HTML format. Users cannot use formatting in the plain text message and the formatting toolbar is disabled.
These settings apply only to a single message. General settings can be defined in Settings (chapter 1.13.1 User Settings).
Priority — priority of a message. The priority is indicated by an exclamation mark or an arrow.
Request a read receipt — if this option is enabled, the recipient's client sends the sender an automatic alert that their message has already been read (if conformed by the reader). This option can be therefore used also in cases where an answer is nt explicitly demanded but it is important to know whether the message has been read.
Request a delivery receipt — check this option to request an automatic notification of the message's successful delivery. The notification does not provide the information of if the message has been read.
The message body consists of the text and attachments (if any).
The message body can be sent as plain or formatted text. Text formatting is allowed thanks to an embedded HTML editor that supports text formatting functionality. However, writing of the email messages in this editor is not supported by some of the browsers:
Firefox — HTML editor is functional, only some of the buttons are disabled (Cut, Copy and Paste icons). Users can use keyboard shortcuts instead of these buttons (chapter 1.13.5 Keyboard shortcuts used in the Kerio WebMail).
To format the message text in Kerio WebMail, use icons in the toolbar above the text field.

- Edits
The dialog box contains standard Cut, Copy and Paste tools. It is possible to use standard key shortcuts (
Ctrl+Cfor copying,Ctrl+Vfor pasting andCtrl+Xfor cutting of the selected object) or the first three icons on the toolbar.Besides the buttons, the Drag & Drop method can be applied when moving or copying text a message. Simply select part of the text and drag it to the desired position while holding the mouse button. Hold down the
Ctrlkey to copy the text.- Font
The font can be changed the same way as in other editors. Users can select different fonts, sizes, colors and styles:
Fonts — in Kerio WebMail, some basic fonts are available: Arial (Black), Courier, Times New Roman and Verdana.
Font size — click the appropriate icon in the toolbar to change the font size.
Font color — click the appropriate icon in the toolbar to change the font color.
Font style — standard icons for selecting a font style are available in the editor: bold, italic, underlined.
Remove formatting — clicking on the icon removes all formatting from the selected text.
- Paragraph
The text paragraphs can be aligned right, left and centered, as well as indented from the left margin. Use the standard icons in the toolbars to change the appearance of the paragraph.
- Bullets and numbering
Standard icons for creating bullets and numbered lists are available in the toolbar. Click the selected text to enable the bullets/numbering. When users click the icon again, the bullets/numbering are disabled.
- Text highlighting
The selected text can be highlighted in one of the colors of the palette in the toolbar (the last item).
- Hypertext
A hyperlink is an active portion of a text, usually underlined and marked by a different color, that direct users to an intranet or Internet site. The hyperlink is used for directing to web pages, downloading files, sending email or accessing discussion groups.
Use the icon in the toolbar to enter the URL for the hyperlink.
Use the icon to delete the hyperlink.
The following example illustrates how to use the hyperlinks:
Here is a fragment of a possible message body: “I am sending you a link to an interesting website”. The “interesting website” part can be used as a hyperlink.
Solution:
Mark the words “interesting website” by cursor and click the button. A dialog box for creating a link appears. Specify the URL entry with corresponding URL address.

Warning
If an email composition takes longer, connection between the server and the browser may be lost. If this happens, finish the message and enter your user password in the dialog which is opened upon attempting to or the message. Then the attempted action will be performed.
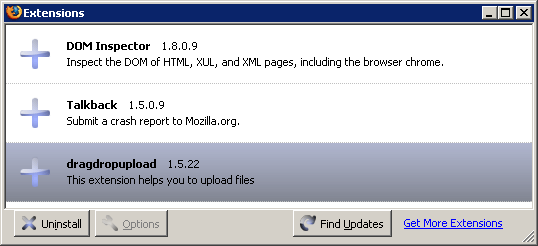
Firefox supports moving of attachments to the message editor's window by the Drag & Drop method. The dragdropupload plugin is required for this action (available at https://addons.mozilla.org/firefox/2190/).
After installation, it is necessary to check whether the plug-in was installed successfully.
In the Tools menu, select Extension.
This opens the Extensions dialog. After successful installation, the dialog contains the dragdropupload plug-in (see figure 1.29 The Extensions dialog).
The plug-in allows to attach one or more files to email messages by the Drag & Drop method in one of the following ways:
Open the message editor. To attach files to a message, left-click on them, hold the mouse button and drag them to the toolbar button. This adds the attachments to the message.
Open the message editor. Click on . This opens an empty entry for specification of the attachment path. Simply left-click on the files to be attached, drag them to the blank entry and release the mouse button. This attaches the files to the message.
Use the button in the New mail toolbar to start the spellcheck. If an error is detected, a dialog is displayed with the incorrect phrase highlighted (see figure 1.30 Spellchecker). The following options are available:
Select a correct phrase in the Suggestions dialog box and click OK to confirm.
Insert the correct phrase manually in the Change to dialog box and click Change to confirm.
If the phrase was entered correctly, click to skip the phrase.
Use the button, if the phrase appears frequently in the text. All occurrences of the phrase in the text will be skipped.
Click to add the phrase in the dictionary. New phrases can be also added using a special dialog box created for this purpose — see below.
Click to delete the phrase.
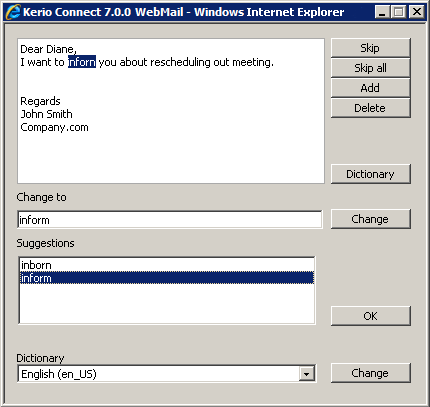
In order for the dictionary to work properly, select the correct dictionary for the written text. Users can use either the Dictionary menu (the last item in the dialog) or Settings menu (chapter 1.13.1 User Settings).
Kerio WebMail contains a personal custom dictionary where unknown phrases not available in the default spellcheck dictionary can be entered. Each user can thus create his/her own dictionary.
The default dictionary used for spellcheck can be amended when needed. Select the Dictionary item from the menu in the spellcheck dialog. Users can add or delete words to and from the dialog box that is opened. New words and expressions can be added to the dictionary also when spellchecking a message.
Spam messages are mostly represented by advertisements. Spam are usually sent in bulk and the recipient addresses are obtained by illegal means (e.g. by tapping the network communication). In their wilder modifications, spams may also distribute and seed dangerous viruses.
Kerio Connect contains a sophisticated antispam filter. The filter is designed so that it can recognize specific attributes of spam from the message contents (spam messages usually contain specific keywords that can be recognized and counted by the filter). Each message is assigned a numeric score; if this value exceeds the limit set in Kerio Connect, the message is marked as spam.
The built-in antispam filter may let some spam messages through from time to time by mistake (their score is low) and mark some regular messages as spam (their score is too high). For the reasons above, the antispam filter allows modification to the database used for recognition of spam messages. This method, however, requires user input. Users should reassign the incorrectly evaluated messages to correct types (spam / non-spam) so that the filter learns to recognize them in the future.
Kerio WebMail uses the and buttons located in the toolbar to mark the messages correctly. Highlight the incorrectly marked message and click one of the buttons. The filter receives information regarding update of the database. This decreases chance for incorrect deliveries.
All messages marked as spam can be automatically delivered to Junk E-mail folder, created in the folder tree for this purpose. This function may be enabled when creating the email account or it can be enabled by the users themselves in their user settings, on in theSpam tab (for details, see chapter 1.13.1 User Settings).
To enable the spam rule, check the Move spam to the Junk E-Mail folder on the Spam tab (see figure 1.31 User settings — Spam tab). Once the rule is enabled, it is also recommended to enable the rule which allows messages sent from addresses included in the user's contact folders skip the antispam check.
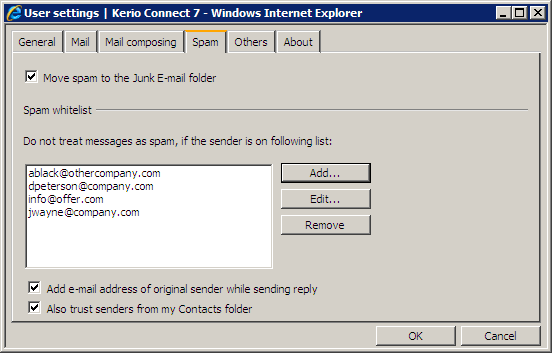
It is also possible to add addresses to a special whitelist. Messages sent from the addresses involved in the list will be considered as non-spam. To add an address to the whitelist, users can use one of the following options:
On the Spam tab in user settings (see figure 1.31 User settings — Spam tab).
Right-click a message in the list to open the pop-up menu and select Add user to spam whitelist.
This option prevents from moving solicited messages with some attributes of spam to the Spam folder.
Note
The spam rule has higher priority than rules set in the Filters dialog box (see chapter 1.14 Message filtering). If the filter includes any rule which in any way handles messages marked as spam, the action set in this rule is ignored.
Automatic check for email addresses helps to accelerate writing of addresses and ensures that the addresses entered will be correct.
Upon entering of first letters of email address in the address entry, this feature uses all contact folders to look up all addresses matching the string. The search focuses on items First Name, Last Name, E-mail Address and Company. The offered items include also user groups with email address and distribution lists if their name (or their email address in case of groups) matches the string.
If multiple addresses matching the string are found, a menu is opened that lists all addresses, user groups and distribution lists matching the string (see figure 1.32 List of contacts matching the string).
Initiation of the look-up function depends on Kerio Connect configuration:
Automatic check for addresses is disabled in Kerio WebMail Settings (see section 1.13.1 User Settings) — to check for an address, it is necessary to click on the Check Names button icon available on the toolbar or to use the
Ctrl+Kkeyboard shortcut.Automatic check for addresses is enabled in Settings — detected addresses matching the string are filled in the entry when the pointer is moved to another textfield. To check for addresses while entering multiple addresses, click on the icon on the toolbar or use the
Ctrl+Kshortcut.
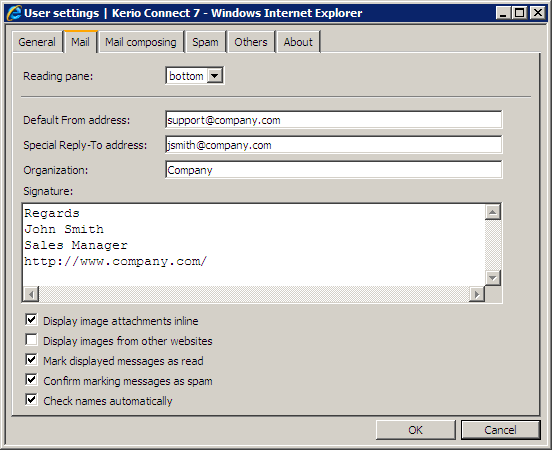
In Kerio WebMail, the automatic check for addresses can be enabled/disabled under Settings:
Go to Settings (under ).
Switch to the Mail tab.
Check or uncheck the Check names automatically option (see figure 1.33 Settings — Automatic checks for addresses).
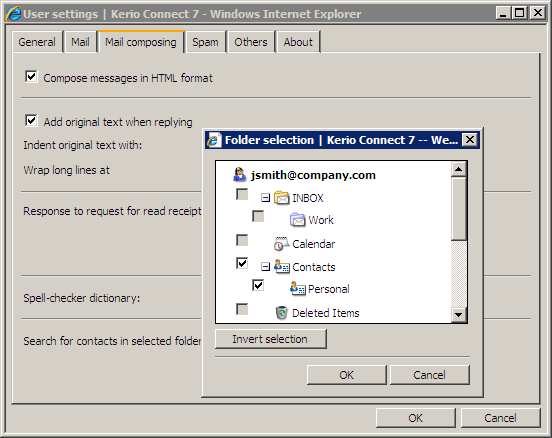
Addresses are searched in contact folders where the check is enabled. By default, the check is enabled only for the default private Contact folder and the default public Contact folder. Other folders can be added as described below:
Go to Settings (under ).
Switch to the Mail composing tab.
Click on at the Search for contacts in selected folders item.
Check folders to be added to the scanned folders (see figure 1.34 Settings — Adding contact folders to the automatic check for names).
Click to confirm settings.
Warning
The more folders are included in the check, the longer the search may take.
The message look-up helps find specific messages quickly, using the criteria defined. The standard search form is used for searching messages in Kerio WebMail mail folders. Use the button (the magnifying glass icon in the toolbar) to open the form.
The search window is divided into three parts. The first part lists the folder where the search is performed (the current folder by default). To change this setting, click the button located on the right of the Folder item.
The other part of the window contains two tabs used to define the search parameters. On the General tab, users can perform the basic search by subject or sender/recipient.
- Search for:
Insert a string that will be used as a searching criteria.
- Where
The menu offers only the Subject option.

To search by subject, enter a corresponding string to the Search textfield and click on Search. Searching results will include all messages which contain the string.
- Sender
Use the textfield to specify a string that will be used as a searching criteria applied to senders' addresses. You can also click the button to open a dialog box where email addresses can be selected from your contact folders.
- Recipient
Use the textfield to specify a string that will be used as a searching criteria applied to recipients' addresses. You can also click the button to open a dialog box where email addresses can be selected from your contact folders.
It is also possible to combine searching criteria. For example, to search a particular message where you know the sender, use the Search (searching by subject) textbox to specify a particular string and the Sender field to enter an email address.
Use the Advanced tab to specify additional criteria for searching:
- Only items that are
Narrowing of items by the read/unread criteria.
- Only items with
Narrowing the list of items by the flagged/non-flagged criteria.
- Only items
Narrowing the list of items by the attachment/no attachment criteria.
- Date
Searching messages sent or received within the selected time period.
- Size
Searching messages by size.
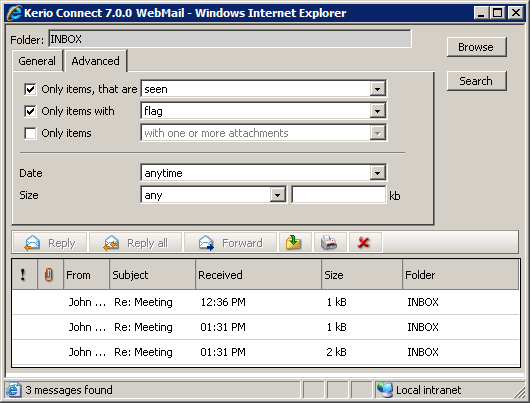
The last part contains a table with search results and a toolbar. Using this toolbar, users can handle individual messages right in the table.
Another way of looking for a specific message is the Search field in the toolbar. Search string (a word, part of a word or a character) can be entered in this field. Messages are looked up by sender address or message subject. Simply enter the first letters of an address or subject. The messages found will be listed directly in the message list.
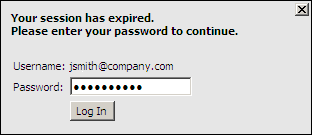
Sometimes, the connection between Kerio Connect and a web browser may be interrupted. Connection may be interrupted by a connection failure or by expiration of the session timeout set in Kerio Connect.[1].
If the connection fails, it is necessary to reconnect by authentication by username and password.
If a message is just being edited when the connection fails, it is possible to finish it and reconnect by authenticating by username and password upon clicking on the button (see figure 1.37 The dialog for authentication through username).
Warning
Beware of closing the window with the edited message before the new authentication. Otherwise, the message will be lost.
[1] Kerio Connect allows setting of timeouts for total time of sessions and for idle connections. These settings increase security of Kerio WebMail usage.