Since Mac OS X 10.5 Leopard, Apple iCal supports the CalDAV protocol. This protocol is also supported by Kerio Connect, making it possible to use the protocol for communication between both applications.
Synchronization over CalDAV features the following options:
synchronization of calendars,
synchronization of To Do with the Tasks folder in the mailbox,
scheduling of meetings,
resource scheduling,
delegating folders,
providing information regarding availability of Kerio Connect users,
setting of private events in calendars (featured on Apple iCal 3.0.3 and higher).
If you use Mac OS X 10.5 Leopard and you have so far used the Kerio Sync Connector for synchronization of calendars, it is recommended to disable synchronization of calendars and set connection to CalDAV server, because this option provides also the option of meeting planning and delegation of calendars to other users.
Warning
If you have installed and configured Kerio Sync Connector, synchronization of calendars over Kerio Sync Connector is stopped automatically upon setting a CalDAV account. This does not affect synchronization of contacts.
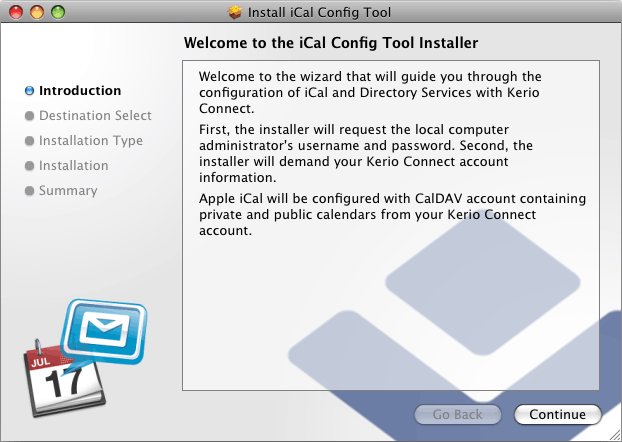
Kerio Technologies have developed a tool for automatic configuration of CalDAV accounts in Apple iCal. This implies that now you simply download and run this tool on your computer. The only information required for the installation is as follows:
username and password for the corresponding account,
username and password for an account with administration rights for the workstation.
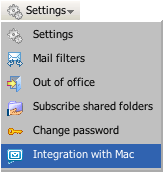
The tool can be downloaded from the special page Integration with Mac OS X. To open this page, go to the Kerio WebMail interface's (see figure 9.1 Kerio WebMail — Settings).
Note
For detailed instructions on authentication to Kerio WebMail, refer to chapter 1.2 Authentication to Kerio WebMail.
On the Integration with Mac OS X page just opened (see figure 10.2 Integration with Mac OS X), click on the Auto-configure iCal link.
The tool gets downloaded to your workstation and gets launched automatically (see figure 10.3 Launching iCal Config Tool). Click on .
In the next page, select location where the tool will be saved and where it will be launched from.
Unless motivated by specific reasons, do not change the default settings and click on .
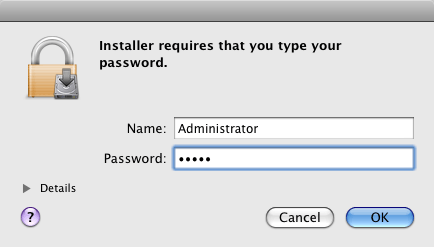
Now enter username and password of an administration account for your computer (see figure 9.4 Entering administration username and password).
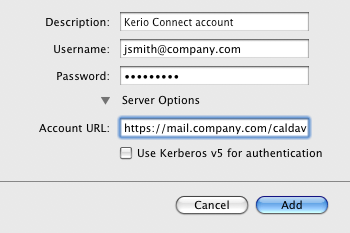
Then specify login username and password for connection to a Kerio Connect account.
Once the wizard is completed, the CalDAV account in Apple iCal is ready for use.

Unless motivated by special reasons for manual settings, perform the configuration by using the iCal Config Tool described in section 10.2.1 Automatic configuration.
To set a CalDAV account in Apple iCal, follow these guidelines:
Run Apple iCal.
In the menu, select and go to the Accounts tab.
Click on the button to create a new account.
In the dialog opened, enter your username following the pattern
username@domain(e.g.gbush@company.com) and password. If the account belongs to the primary domain, login by username without domain is sufficient. You can also define description of the account.Click on Server Options and specify server name following either the pattern
http://server_name/caldavorhttps://server_name/caldav(see figure 10.6 CalDAV account settings — Preferences). It is recommended to go for thehttpsoption which provides more secure connection between the server and the client. To make HTTPS work, you must install a SSL certificate on your computer (the guidelines are available in chapter 8.9 Secure communication of Kerio Connect with MS Entourage).The full URL is also available at the page Integration with Mac OS X. To open this page, go to the Kerio WebMail interface's (see figure 10.5 Kerio WebMail — Settings). For detailed instructions on authentication to Kerio WebMail, refer to chapter 1.2 Authentication to Kerio WebMail.
Warning
It is not recommended to enable the Use Kerberos v5 for authentication option, since Kerio Connect does not support this authentication method.
If the account is set correctly, Apple iCal and the mailbox get synchronized.
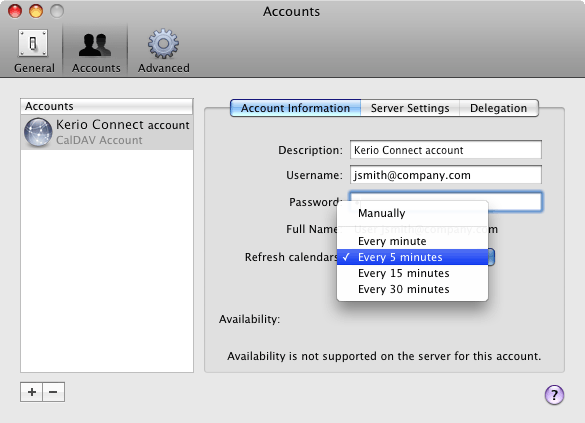
Now you can set intervals for automatic synchronization:
Once a CalDAV account is set, the window with calendars contains also a new tab where all calendars of the Kerio Connect account created right in the root folder are shown (for details, see section 1.12.1 Root folder). Subfolders cannot be synchronized.
In Apple iCal, new calendars can be created either in personal calendars (but such calendars will not be synchronized) or in the CalDAV account where every calendar is saved also on the server. All such calendars will be available in the Kerio WebMail interface or in any other email client supporting calendars.
The same rules are applied vice versa. If a new calendar is created in your email client and located as a root folder's subfolder, its copy is created also in Apple iCal and it will be synchronized using the parameters set in the configuration.
Apart from, calendars, also To Do items created in synchronized calendars will be included in the synchronization. All To Do items will be synchronized with the default Tasks folder.
Tasks in the Tasks folder created for example in Kerio WebMail will be synchronized into the Calendar folder in Apple iCal.
Public calendars must be subscribed by their delegation. Instructions to be followed can be found in section 10.2.7 Delegation of calendars.
Meetings are special calendar events where email addresses of other participants can be involved. Once a meeting is created, addresses can be added to which the message will be sent — these special messages are called invitations. Invitations are special messages informing users of topics, times and place of a meeting. Invitations include special accept/reject buttons. Information derived from the participant's reaction is sent to the meeting initiator (chair member). The initiator thus know whether the persons invited come or not. It is also possible to send updates related to meetings when the initiator modifies the invitation.
Meetings are created as events:
Double-click on a calendar and create an event.
Double-click on the event and click on in the dialog just opened.
This opens an event's edit window where advanced settings can be done.
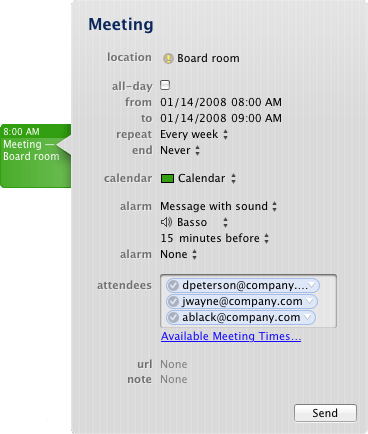
Use the attendees option to specify email addresses of invited users (see figure 10.8 Meeting settings).
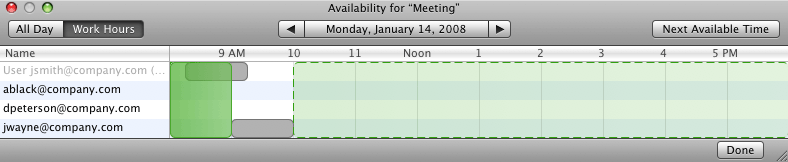
Once addresses are specified in the attendees textfield, the Available Meeting Times link appears. Clicking the link opens the Availability window where free and busy times of each attendee are shown on individual timelines so you can choose the best time for the meeting. The timeline shows times for which the attendees already have scheduled any events in their calendars saved on the server (for details, see figure 10.9 Viewing Free/Busy information of the meeting attendees).
Use the button to send the invitation.
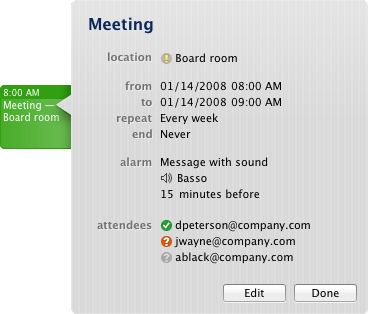
Once the invitation is delivered, the attendees may either accept or reject the meeting. In the meeting edit window the organizer can see the attendees' decisions (see figure 10.10 Meeting acceptation/rejection).
If an invitation is delivered to Apple Mail, open an attachment with the .ics extension and save the invitation in Apple iCal. Unconfirmed invitation is displayed with dashed frame in the calendar. Now double-click on the invitation and either accept it by the button or reject it by clicking on (see figure 10.11 Meeting acceptation/rejection).
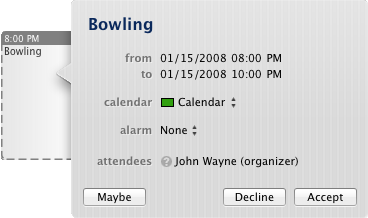
Your response will be shown in the meeting's attendees section (see figure 10.10 Meeting acceptation/rejection).
Kerio Connect now provides an electronic management of resources shared by employees of your company. Resources are rooms and devices available in the company, such as OHPs, whiteboards, cars, etc. Resource management allows to:
book a resource for a particular time,
view current resources and their reservations in the Free/Busy calendar (for details on Free/Busy calendars and information on appointments, see section 10.2.4 Appointments) when planning reservations,
subscribe resource calendars by using standard sharing/delegation,
set the resource manager who can decide on priorities in case of any collisions in reservations.
Resources can be booked by using the existing calendar system. Resource reservation is based on creating of en event. The feature works similarly as appointment scheduling. The main difference is that the Attendees tab must include the resource selected from the contact list (it can naturally also include contacts of attendees). In the Free/Busy calendar you can see whether the resource is available for the scheduled time or not.
Note
To make a resource available for booking, it is necessary to create it in Kerio Connect first. If you need to create a new resource, contact your network administrator.
To book a resource, follow these instructions:
Open a new event, enter its subject and time for which the resource should be reserved.
Add the resource(s) email address to attendees entry (e.g.
car1@company.com).Click on the Available Meeting Times link.
If the Free/Busy calendar is working correctly, existing reservations of the involved resource(s) are showed. It is therefore easy to check right away, whether the source is free or already booked by another user for the suggested time (see figure 10.12 Resource reservation).
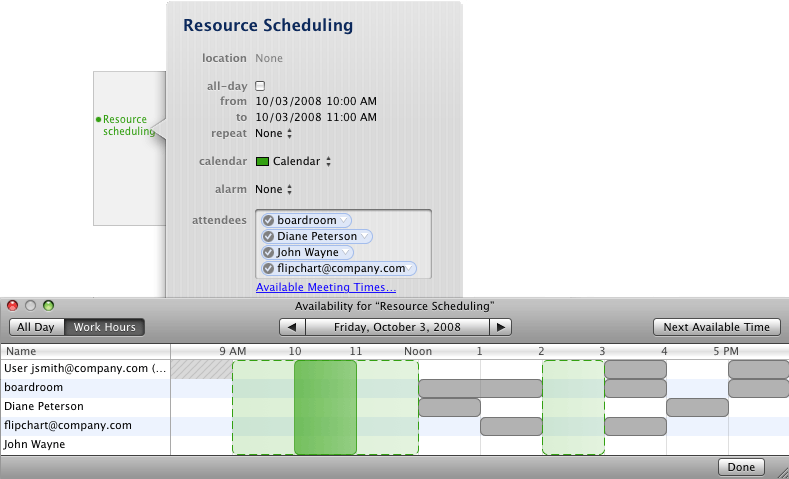
You may have noticed that there are also other attendees in the list shown in figure 10.12 Resource reservation. Resources can be reserved either for usual appointment or for meetings (see section 10.2.4 Appointments).
Each resource created in the system has its own calendar where all reservations are displayed. Calendars of individual resources can be subscribed through the standard delegation process (delegation of folders is focused in chapter 10.2.7 Delegation of calendars).
Most user can access resource calendars in the read-only mode. Resource calendars can be edited only by the resource manager. The role of resource managers and their rights are addressed in the following section.
In certain situations, it is necessary that a resource is booked even if it has already been reserved or that there is no other way than to make the reservation by a phone call. For such purposes, there exists a user with special rights who is a manager of the company resources. Resource managers can access resource calendars with administration rights. This implies that they can edit, remove or move reservations in the particular resource calendar. They can also create new reservations.
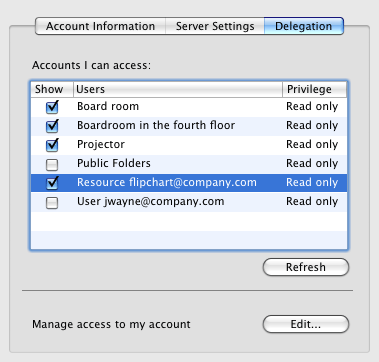
If you are a resource manager, first it is necessary to subscribe calendars of all resources that you would manage:
Open the account settings (the Accounts tab in iCal → Preferences).
Switch to the Delegation tab (see figure 10.13 Context pop-up menu of the root folder).
In the list of delegated folders, check all resources that you will manage. Delegated calendars then appear in Apple iCal immediately.
Availability in Apple iCal is a calendar feature which allows extended setting of Free/Busy calendars (details on Free/Busy calendars are provided for example in section 8.3 Scheduling of meetings). These advanced settings address working hours of employees. Simply said, availability makes it possible for appointment setters to check in which hours you are available at work.
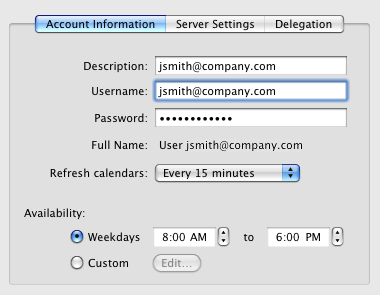
To set availability in Apple iCal, follow these simple guidelines:
Go to .
On the Account Information tab, you can find the Availability item (see figure 10.14 Checking availability in Apple iCal) where you can execute desirable settings.
CalDAV account in Apple iCal allows delegation of calendars located in Kerio Connect.
Delegation makes it possible for other users to access your calendar or for you to access and possibly also work with calendars of other users.
If someone delegates a calendar for you, you will need to subscribe it.
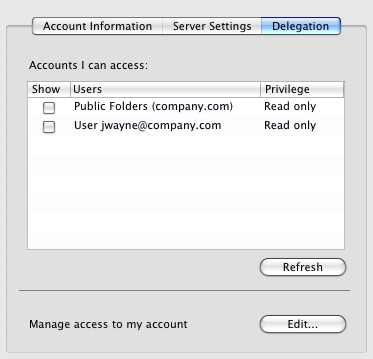
Open the account settings (the Accounts tab in iCal → Preferences).
Go to the Delegation tab (see figure 10.15 Subscription of delegated calendars).
If the calendar was delegated correctly, the list includes the delegator's username. Now simply check the Show field to view the delegated calendar in Apple iCal.
It is possible to delegate only the entire CalDAV including all calendars it contains. To delegate it, follow these instructions:
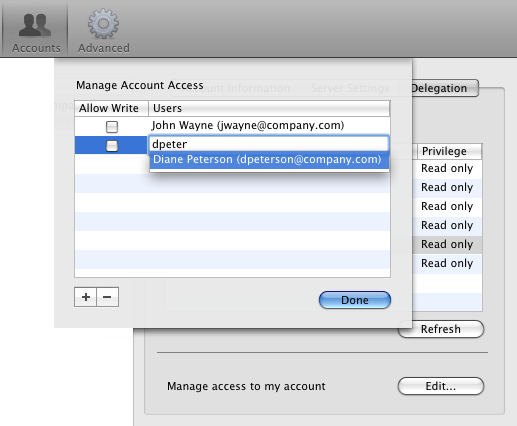
Open the account settings (the Accounts tab in iCal → Preferences).
Go to the Delegation tab (see figure 10.16 Delegation of calendars).
In the Manage access to my account section of the dialog, click on .
In the list, enter username of the user to whom you want to delegate the calendar (see figure 10.16 Delegation of calendars). After having typed a few starting letters, names should be offered automatically from the list.
Users can be assigned rights either for reading only or also for writing. Read rights are assigned automatically upon addition of the particular user to the list. To assign user with writing rights, check the option.
To delegate calendar to a user who wants to subscribe it in Apple iCal, you can use standard sharing procedure for example in the Kerio WebMail interface. However, access rights for sharing are not identical with delegation rights. Below you will find guidelines for such cases:
Calendars shared in Kerio WebMail allow the following access rights levels:
Read rights — user can view the calendar.
Write rights — user can view the calendar as well as edit it, the only action denied is removal of the calendar.
Full rights (administration) — user can view, edit and even remove the calendar.
Apple iCal distinguishes between the following access rights levels:
for reading only,
full rights (administration).
As suggested above, delegated calendars with write rights will be understood by Apple iCal as calendars with full rights access. However, users with these rights is not allowed to remove the calendar.
For these reasons it is recommended to set either read or full access rights to your calendars in Kerio WebMail.
Warning
Access rights apply to the entire account of the delegating user. If any user delegates more than one calendar, the lowest access level is set for all these calendars. This implies that if there is at least one calendar delegated with read rights, all delegated calendars will be available for reading only.
Events are private when they are set as Private. This feature secures event details of calendars delegated to another user from being viewed by this user. The users with whom the particular event is shared cannot view its content, edit it or remove it. Such users will see only the item labeled as Private event. The only information these users learn from the calendar is date and time.
Note
In the Free/Busy calendar, the level of busyness and the time of private events are available.
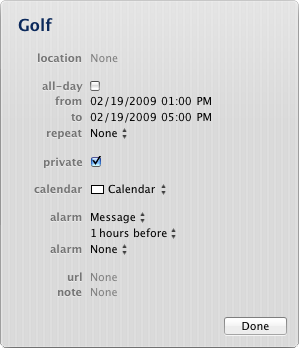
Private events can be created as follows:
Open the event edit box.
Insert relevant information.
Check Private (as shown in figure 10.17 Event edit box).
Save changes by using the button.
Warning
Private events are treated as private only if the client where the private event calendar is viewed supports this feature. In other client applications, it is possible to view and edit events without any restrictions by users with appropriate access rights. This implies that information included in private events are not well secured.