Most of us use or at least know address books and little notebooks where names, phone numbers and addresses of family members, friends, colleagues, business partners and other people are kept. Another possibility to remember contacts is keeping of business cards provided by people we meet. In these times of booming electronic communication where we are almost becoming slaves of time, looking contacts up in tiny pocket books and visit-card filers is too time-consuming and ineffective.
For this reason, contact folders have been developed. Actually, these folders are electronic address books replacing the old-fashioned methods of contact maintenance. In addition to the fact that all contacts are kept together, other advantages come along, such as easy look-up and automatic recognition of known email addresses while being written.
In addition to creating and maintaining of single contacts, contact folders allow creating and maintaining of distribution lists. Distribution lists are groups of contacts recognized by a single group name. This name is simply used instead of entering all included addresses separately.
The contacts in Kerio WebMail can be displayed in two ways; either as individual cards, or as a list of contacts. Use the menu in the toolbar to set the display mode (see picture 1.38 Contacts).
For classification by contacts, items are sorted by the alphabet of the language set in Settings as preferred (the General tab) in Kerio WebMail — for details, see chapter 1.13.1 User Settings. In result, if for example English is set as preferred and subject are in German, contacts will be ordered by English alphabet and some specific national characters may also cause problems in sorting.
By default, up to 20 contacts are listed on one page in contact folders. Number of messages displayed at one page can be changed, however, it is necessary to keep in mind that the same settings apply also to email and task folders. To change number of items displayed on a single page, use the Settings section in Kerio WebMail (see chapter 1.13.1 User Settings).
Besides other methods, the cards can be sorted by alphabet letters, available below the toolbar as links. By clicking a specific letter, the first contact starting with this character will be highlighted.
TIP
Pressing Shift-letter when searching in the row of letters, the contacts starting with this character are marked.
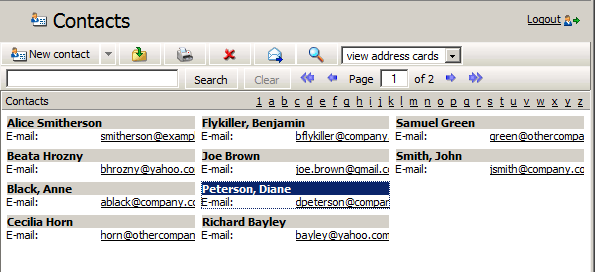
Users can also use the purple arrows to navigate between the pages with contacts.
In the list view mode, information to individual contacts are listed in the columns. Contacts can be sorted according to the information This view mode provides several advantages. First, columns can be sorted and ordered in accordance with information they include. Click the column heading to sort contacts in the ascending or descending order (see the arrow next to the column name) by alphabet, numbers or time (depending on the column contents).
Users can also customize the information to be displayed. The columns can be added or deleted. Right-click the table header and specify the column settings in the window where columns to be displayed can be selected. The pop-up menu contains the Change columns option.
The width of the contacts list can be adjusted the same way as in the spreadsheet programs. To change the column width, click between two columns in the table header and drag the cursor right or left as needed. When the window is refreshed, layout of the columns is set to the default mode.
To create a new contact, follow these guidelines:
Open a contact folder.
Click on the New contact button in the toolbar
to access a dialog box with three tabs where the contact information can be entered.
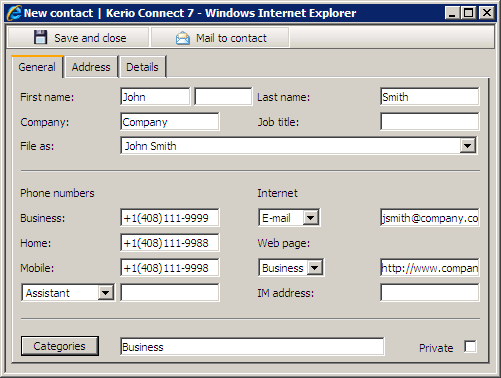
The first tab (see figure 1.39 New contact — General tab) includes entries for general information to be specified. (the first and last name, phone number, email address or personal web page URL can be specified).
In the Address tab, home address data for each user are stored. In this tab, three different addresses — Business, Home and Other — can be specified. The address type can be selected in the Address menu. Check the This is the postal address option to select one of the addresses as primary.
The Details tab contains additional information about the contact, such as birthday, anniversary or title.
Private contacts can be used especially for sharing of contact folders with other users. If a user shares a private contact folder with other users, it is possible to mark certain contacts as private. These contacts will not be displayed to anyone else except the user with whom the contacts are shared and even the person who shares these contacts cannot see them in the shared folder.
To mark a contact as private, do the following:
Double-click on the contact to show its details.
On the General tab, enable the Private option (see figure 1.39 New contact — General tab).
Save changes by clicking .
Warning
Private contacts are treated as private only if the client where the private contact folder is viewed supports this feature. In other client applications (like MS Outlook), it is possible to view and edit contacts without any restrictions by users with appropriate access rights. This implies that information included in private contacts are not well secured.
There are several ways of searching in contact folders based on the type of display. The cards display enables users to search for contacts using the letters under the toolbar. By clicking a specific letter, the contacts starting with this character are highlighted.
When contacts are displayed in the form of a list, only the standard ascending and descending order of messages is possible. Thus, searching for a specific contact is not very efficient, especially when there are too many contacts in the folder.
Searching for contacts using the Search window is completely different from the above procedure. Use the button (the magnifying glass icon in the toolbar) to open the window or enter a string (a word, part of a word or a character in the message to be searched for) into the Search for: field in the toolbar.
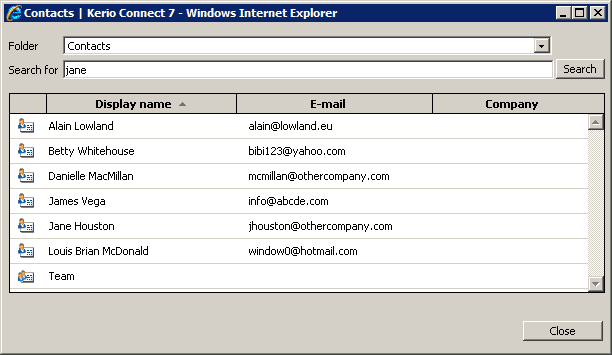
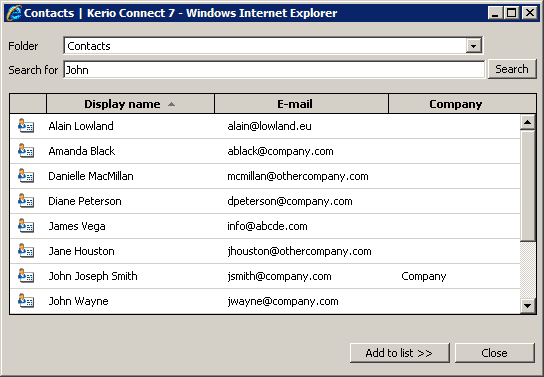
Use the first option (the magnifying glass button) When opened, the dialog window provides a list of all contacts saved in the folder. When searching for a particular contact, the following information is used as the search criteria:
- Folder
Set folders in which the search will be performed. By default, the folder from which the dialog was opened is selected.
- Search for:
This entry can be used to enter a string which will be searched (the first letters of first name, second name or username can be used). The search string is not case-sensitive.
Click on to run the searching.
Users can also enter the search string into the appropriate field in the toolbar. Click to open the Search window. Only the contacts containing the specified string are listed. If the searched contact is not included in the table, retry the search process upon modifying the string or switching to another folder (the search applies only to the folder currently opened).
Kerio WebMail allows contact forwarding in a special format so that forwarded contacts can be directly added to contact lists upon their delivery. Thanks to this feature, it is not necessary to copy contacts to email messages and to contact lists.
Kerio WebMail also supports another option. When a message with a contact in the attachment is received, the recipient can simply click on the attachment to open the contact automatically in the standard dialog box. Click on to confirm settings and save the contact to the default private Contacts folder.
Note
To save a contact or open it as an attachment, right-click on it and use one of the options available, Open or Save.
To forward a contact, follow these guidelines:
Use the cursor to select the particular contact and click on the icon in the toolbar.
This opens the message composer with the contact already attached.[2]
Send the contact in the same way as email messages are sent.
In addition to contacts created by yourselves and stored in your personal folder, there is also a contact list available in the Contacts public folder. To read more about public folders, go to chapter 1.12.5 Shared and public folders. Most of users can only read these folders, without permission to edit them or create new ones. However, if you are a contact administrator, please pay attention to the information provided below.
Methods of how contacts are kept on the server differ. Whereas folders with personal contacts are not synchronized and users themselves are their administrators, the folder with public contacts is synchronized with data from user accounts which have been created either on the server or in a directory service. For that reason, it is not recommended to change full name, email address of contacts and the Global Address List category in the public folder of the Kerio WebMail interface. All these changes would be removed during next synchronization. If you need to edit a contact, please contact your network administrator. It would have to be edited in the user account (either in Kerio Connect or in the particular directory service).
Distribution lists are groups of email addresses used for sending of collective email. Simply use a special dialog in Kerio WebMail to complete desired email addresses and save them under a common name. Whenever sending an email message to such a group, simply enter the distribution list name in the To entry instead of filling in individual addresses.
Distribution lists are helpful if email is often sent to a group of addressees. For example, it can be a group of people with whom you often communicate in your work (it is a certain alternative to mailing lists or to group addresses).
Once created, distribution lists are displayed in the contact folder. If multiple contact folders are used, the particular distribution list is saved in the folder where it is created. If the list is for example created in a task folder, the distribution list is automatically saved in the default private contact folder, in Contacts. to distinguish distribution lists from other items in the contact list, they are displayed bold.
To create a new distribution list, follow the instructions provided below:
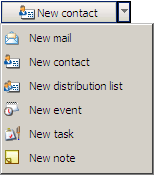
Click on the button which allows creating of new items (see figure 1.41 Toolbar menu).
In the menu, select the New distribution list option.
This opens the window where you can create a new distribution list.
Now, specify name of the distribution list. For this purpose, use the Name entry.
Now, add email addresses to the list. The and buttons can be used for this purpose:
The button opens a dialog where addresses can be looked up and selected in contact folders.
The dialog contains the following items:
- Folder
The menu includes all contact folders in the mailbox (including public and subscribed contacts).
- Search for:
Enter a string which will be used as search criteria, i.e. any contacts including the string will be searched. First letters of first or second name or username (the part of address preceding the at-sign) can be used as the string. The search string is not case-sensitive.
One or multiple contacts can be chosen in contact lists (by holding the
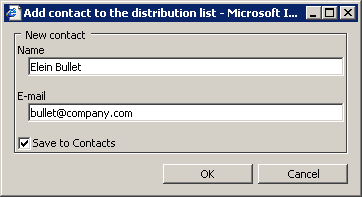
ShiftorCtrlkey and selecting items by the mouse pointer) and then added to the distribution list by the button. Double-clicking on a contact also copies the particular item to the distribution list.Use the button to open a dialog where a new address can be added to the list. The address needs to be entered manually:
- Name
Enter first and second name of the new distribution list member.
Enter email address of the new distribution list member.
- Save to contacts
Enable this option to save member information also in the Contacts folder.
The button can be used to delete an address from the list.
Save changes by clicking .
A note can be attached to any distribution list. It can be for example a description of the group or another information. The note can be defined on the Notes tab of the distribution list dialog.
Besides the method described above, there is another way to create distribution lists. Simply select one or more items in the contact list (using the Ctrl key), use the right mouse button to open the pop-up menu and select Create a distribution list (see figure 1.44 Creating distribution lists by selecting contacts from the list).
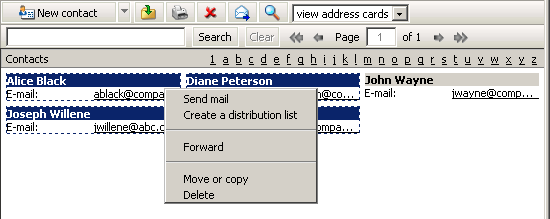
This opens a distribution list with the selected contacts already included. This list can be simply saved after entering its name. Contacts can be added anytime if desired.
Each distribution list can be edited and also removed. To remove a distribution list, follow the same pattern as when removing a contact item. Simply select a distribution list by the mouse pointer and use either the Delete key or right-click on the item and use the appropriate option in the context menu.
It is also simple to edit a distribution list. Double-click on a distribution list to open it. Contact information can be edited, removed or a new one can be added. It is also possible to update a distribution list. It is necessary to perform updates where at least one contact has been changed since the last update. Usually, contacts are edited directly in a contact folder. Such changes take no effect in distribution lists. Therefore, it is recommended to update distribution lists from time to time by the button.
To save changes, click on .