Every single day, we complete various tasks — at work, at home or anywhere else. Those of us equipped with an excellent memory can remember them, others use various tools such as little notepapers and check them off when the items are completed. Task folder play the role of these notepapers in the electronic environment.
Advantages of electronic tasks involve especially central storage of all tasks and automatic alerts, informing of upcoming events.
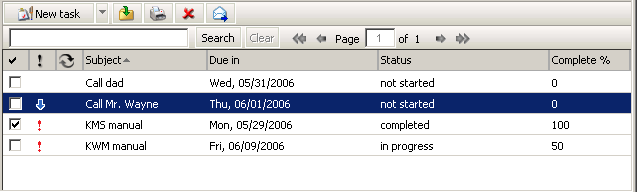
Tasks in folders are organized in a table where each line stands for one task including task name and other information available, such as priority level, etc.
Task folders are equivalent to other folders. They can be shared, set as public or attached. For more information on shared and public folders, see chapter 1.12 Folder Administration.
In Kerio WebMail, the tasks are shown in a simple list that contains data such as the name of the task, scheduled deadline and the status of the task (percentage as well as description).
By default, up to 20 tasks are listed on one page. To change number of tasks displayed on a single page, use the Settings section in Kerio WebMail (see chapter 1.13.1 User Settings).
The detailed information on individual tasks is displayed in the columns. The tasks can be sorted by the details listed in individual columns. Click the column heading to sort tasks in the ascending or descending order (see the arrow next to the column name) by alphabet, numbers or time (depending on the column contents).
Note
For listing by subject, items are sorted by the alphabet of the language set in Settings as preferred (the General tab) — for details, see chapter 1.13.1 User Settings. In result, if for example English is set as preferred and subject are in German, subjects will be ordered by English alphabet and some specific national characters may also cause problems in sorting.
Users can customize the appearance of the table and the information shown. The columns can be added or deleted. Right-click the table header and specify the column settings in the Select fields window. The pop-up menu contains the Change columns option. Checked columns will be shown in the dialog box, unchecked columns will be hidden.
The width of the task list can be adjusted. To change the column width, click between two columns in the table header and drag the cursor right or left as needed.
To create a new task, use the task edit window. To open the dialog, use the option available on the toolbar. The edit dialog box includes two tabs where the following parameters can be set:
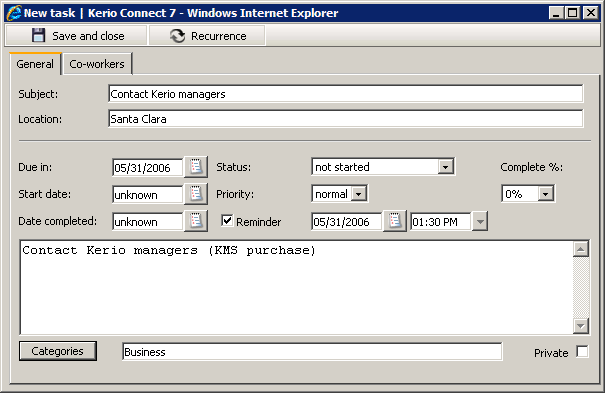
In the General tab, the following task details can be defined:
- Subject
Insert a text which will be later shown in the task list as well as in the Reminder window (if the reminder is enabled for the task). The text should not be too long and it should be as comprehensive as possible.
- Location
Task location.
- Due date
Time required for completion of the task.
- Start date
The date to start on the task.
- Date completed
Date of completion.
- Status
Each task goes through several stages during the process of its completion:
Not started — the task has not been started yet.
Waiting for someone else — useful in cases where the completion of the task depends on another person/other people).
Completed — the task is completed and
100%is automatically inserted in the Finished field.In Progress — the task is being solved. It is possible to enter a number specifying what percent of the task has already been completed in the Done field.
Deferred — the task cannot be completed at the moment (e.g. as there are higher priority tasks). It is useful to set Reminder time to avoid the situation that the task is kept in the list uncompleted.
- Priority
Using this option, the task priority can be defined. Tasks with highest priority are marked with a red exclamation mark, a low priority task is marked with an arrow.
- Reminder
This feature enables users to set a reminder to an upcoming due date. The alarm time can be set to a specific day and time. The option can be disabled by unchecking the box.
The reminder is displayed as a popup window that lists the events and tasks to be reminded at that time. Each row contains the subject of the specific event (task) and time to the next reminder.
Users can extend or reduce the time to the next reminder of a specific event. Set the desired time of event recurrence (from five minutes to two weeks) and click .
Click the or buttons to cancel the selected reminder or all reminders. The dismissed reminder will not be displayed any more unless it relates to a repeated event.
Warning
The reminder window is active only when Kerio WebMail is running.
For notifications, only the basic calendar and task folders (standard folders created automatically when the user account is created) are searched through in Kerio WebMail. If users create other calendar and task folders, keep in mind that the event and task notification will not work in Kerio WebMail. However, if the notification timeout expires when MS Outlook is running, a notification is displayed in a standard MS Outlook window.
- Complete %
Shows what percent of the task has already been completed.
- Comment
Detailed information can be provided for each task.
- Categories
The Categories item is useful only if the web interface is used in connection with MS Outlook with Kerio Outlook Connector preinstalled. Use the tools in this application to display the events in individual categories.
Click the button to display the list of default categories. Users can also create new categories that are more suitable.
- Private
The Private item is helpful especially for sharing of folders. If the folder is shared with other users, tasks set as private can be viewed only by their owner (for details, see chapter 1.10.3 Private Tasks).
When a task is created, it can be sent to other people. This feature can be used for several purposes. For example, it might be desired to inform a superior about a task.
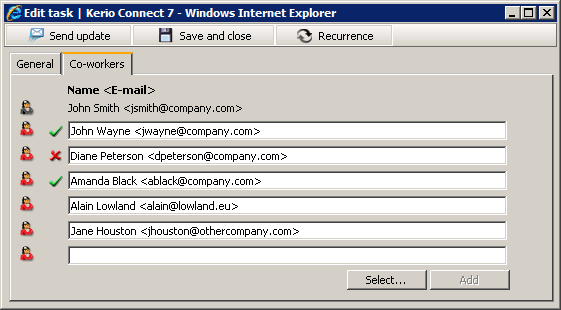
Use the Co-workers tab in the task's edit dialog box to send the task information to other people (see figure 1.67 Co-workers). The Co-workers allows creating of a list of persons to whom an informative email including the task details will be sent when the task is created. The task is sent when created and then again whenever it is updated by the task owner (the initiator). The message is set so that if the co-worker to whom the task was sent uses Kerio WebMail, the task can be saved in the task folder and send a confirmative/rejection message at once.
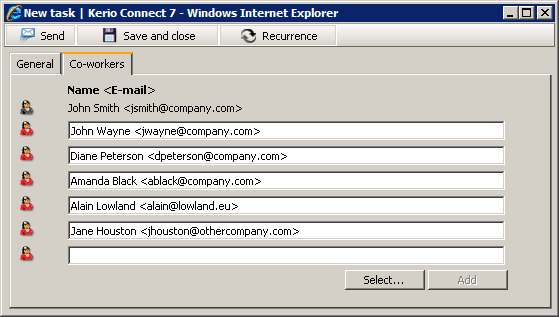
Co-workers and their addresses can be added to the list by the following methods:
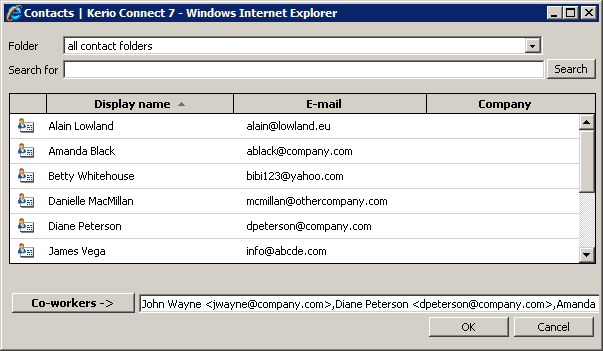
Use the button to search attendees in contacts. Simply look up and add any co-workers included in your contact folders.
The dialog allows setting of the following options:
- Folder
The menu includes all contact folders in the mailbox (including public and subscribed contacts).
- Search for:
Enter a string which will be used as search criteria, i.e. any addresses including the string will be searched. First letters of first or second name or username (the part of address preceding the at-sign) can be used as the string. The search string is not case-sensitive.
One or multiple addresses can be selected from the list (by clicking on them while holding the
Shiftor theCtrlkey) and selected addresses can be added to the co-workers list by the .Note
Addresses can be also added to the co-workers list by double-clicking on a particular item.
Once attendees are selected, save settings by the OK button. The dialog is closed and all selected addresses are listed.
By the button — use the button to add lines where co-workers can be added by hand. This feature allows add addresses which are not included in any contact folder.
The button is not active unless there is at least one line blank where another address can be added. Once addresses are filled in all entries, the button is activated so that another line can be added.
Note
Optimally, enter your collaborator using the pattern
Full Name <name@company.com>Actually, the email address will do.
Once addresses are filled in and the task definition is completed, the task can be either saved or sent to co-workers. Co-workers can accept or reject it. Acceptance or rejection status is shown on the Co-workers tab (see figure 1.69 Task acceptance/rejection)
Click The dialog where recurrence can be set is opened by the icon provided in the upper part of the task edit window.
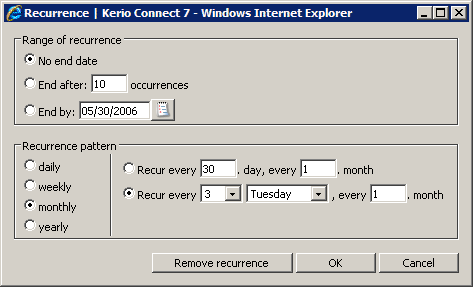
- Recurrence pattern
Multiple recurrence patterns are available (daily, weekly, monthly, yearly). Each of these patterns has different parameters.
- Range of recurrence
Set the desired range of recurrence.
No end date — no end date is set.
End after ... occurrences — the recurrence is over when the specified number of recurrences is reached.
End by — recurrences happen in the specified time.
Private tasks are helpful especially for sharing of folders. If the folder is shared with other users, tasks set as private can be viewed only by the folder's owner.
Private tasks can be created as follows:
Open the New task dialog box.
Insert relevant information.
On the Settings tab, enable the Private option (see figure 1.66 Task settings).
Save changes by clicking .
Warning
Private tasks are treated as private only if the client where the private task folder is viewed supports this feature. In other client applications, it is possible to view and edit tasks without any restrictions by users with appropriate access rights. This also implies that information included in private tasks are not well secured.
Kerio WebMail allows forwarding of tasks in such a format so that it is possible to save it to a task folder. Thanks to this feature we can avoid copying of task data to an email message and to a new task edit dialog box on the addressee's side.
Kerio WebMail also supports another option. When a message with an task in the attachment is received, the recipient can simply click on the attachment to open the task in the standard task edit dialog box. Click on to confirm settings and save the task to the Tasks folder.
Note
To save a task or open it as an attachment, right-click on it and use one of the options available, Open or Save.
To forward a task, select it by the mouse pointer and click on the button on the task folder's toolbar (it is also possible to use the corresponding option in the pop-up context menu).
Select a task and click on a corresponding icon to open a message editor where the task is included as an attachment.[4] At this point, simply send the email message.